
Push Notification helps developer in sending event or alert to app users even when they are not logged into the app. App42 uses APNS (Apple Push Notification Service) to send Push Notification on IOS devices. To configure Push Notification on Unity iOS requires some plugin to be written and it is not straight forward, especially if you are new to Push Notification and plugin writing.
To overcome on this issue and make this process easier for our developer, we have created a plugin that can be used in your project with minimal effort. To make it easy to understand, we have created a Sample Project. Here we will walk you through a step-by-step integration process by taking the examples of the sample we created.
After following all the steps mention in this tutorial you can start building your Unity3D iOS project by following below steps:
// Use this for initialization
void Start ()
{
setListenerGameObject(this.gameObject.name);
}
//Sent when the application successfully registered with Apple Push Notification Service (APNS).
void onDidRegisterForRemoteNotificationsWithDeviceToken(string deviceToken)
{
if (deviceToken != null &&deviceToken.Length!=0)
{
registerDeviceTokenToApp42PushNotificationService(deviceToken,"User Name");
}
}
//Registers a user with the given device token to APP42 push notification service
void registerDeviceTokenToApp42PushNotificationService(string devToken,string userName)
{
ServiceAPI serviceAPI = new ServiceAPI(api_key,secret_key);
PushNotificationService pushService = serviceAPI.BuildPushNotificationService();
pushService.StoreDeviceToken(userName,devToken,"iOS");
}
Using API
Once your app is registered you are ready to send message to your app user using following code snippet from any App42 Unity SDK.
App42API.BuildPushNotificationService().SendPushMessageToUser(userName,message,new Callback());
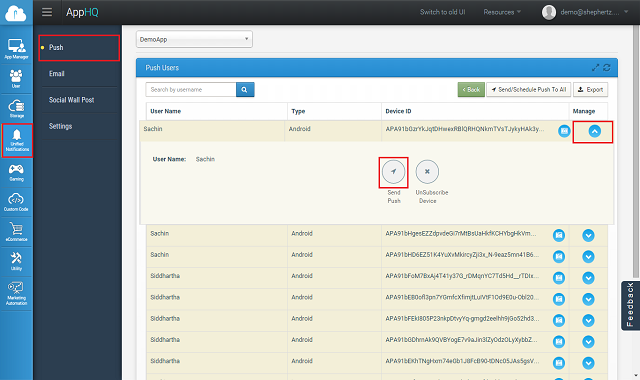
Using AppHQ Console
You can also send push messages to your registered app user directly from AppHQ console. To do this follow the simple steps:
If you want to send push message with sound and badge effect on iOS device, you have to pass JSON string in below format.
string userName = "Nick";
string message = "{'alert':'Hi There...','badge':1,'sound':'default'}";
App42API.BuildPushNotificationService().SendPushMessageToUser(userName ,message ,new Callback());
You can also do it from AppHQ by putting this JSON format in message text area for sending message to iOS device with sound and badge effect.
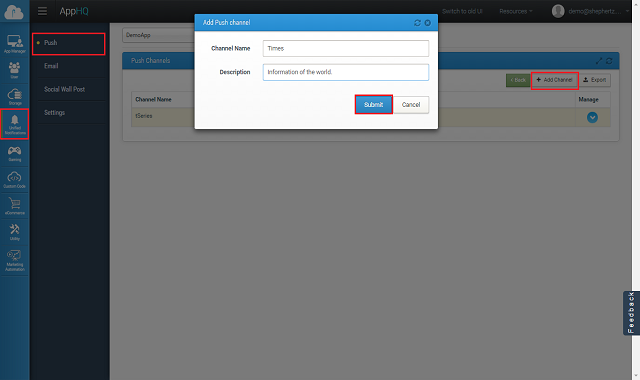
App42 Push notification also supports channel subscription model where user can subscribe on channel of his interest to receive the notification. You can send message to channel which will deliver message to all users who are subscribed to that channel. A channel can be created from AppHQ console. To do this follow the simple steps:
Unity Method :
Here is Unity Code to send Push Notification to Channel.
string channelName = "cricket channel";
string description= "channel description";
//User must be registered with App42 for Push Notification
string userName = "Nick";
//Create Channel
PushNotificationService pushNotificationService =App42API.BuildPushNotificationService();
pushNotificationService.CreateChannelForApp (channelName , description,new Callback());
//Subscribe user to that channel
pushNotificationService.SubscribeToChannel (channelName ,userName,new Callback());
// Now send message on the Channel
string message = "Mumbai Indians won IPL 6";
PushNotification pushNotification = pushNotificationService.SendPushMessageToChannel(channelName ,message,new Callback());
App42 Push Notification Service has introduced API to target users who have specific profile/preference. This API requires user preference or profile persistence in Storage Service as a prerequisite. To identify a specific user segmentation, your app user profile or preference information should be saved on App42 cloud e.g. if you are building a music streaming app and you want to send push notifications to all those users who like Rock music, you should have preference of user stored in App42 cloud already and it can be done using Storage Service as shown below.
Saving User Preference
//Set Logged in User Name
App42API.SetLoggedInUser("USER_NAME");
String profileJSON = "{\"preference\":\"Rock\",\"age\":30,\"company\":\"ShepHertz\"}";
StorageService storageService = App42API.BuildStorageService();
storageService.InsertJSONDocument("DB_NAME", "COLLECTION_NAME", profileJSON, new Callback() );
Sending Push to Segmented User
Once your app user’s profile/preference information is saved, you can send Push Notification to the segmented user who meets specific criteria (Assuming your app user is already subscribed for push notification. For example, here you can send Push Notification to segmented users who likes Rock music as explained below.
Query targetQuery = QueryBuilder.Build("preference","Rock", Operator.EQUALS);
String message = "New Album of Rock Music has just Arrived. Please check it out here!!";
PushNotificationService pushNotificationService = App42API.BuildPushNotificationService();
pushNotificationService.SendPushToTargetUsers(message, "DB_NAME", "COLLECTION_NAME", targetQuery);
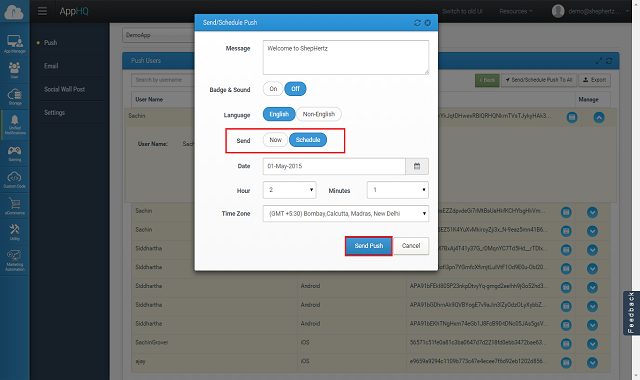
You can also schedule message to your app user on specified time from AppHQ console. To do this follow the simple steps:
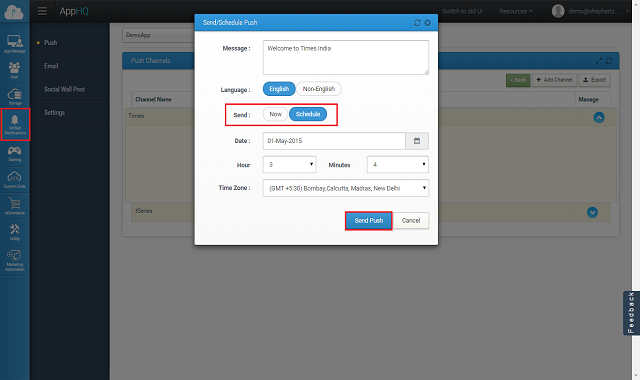
Message scheduling on channel can be done in similar way. To do this follow the simple steps:
Push notification goes from App42 server to GCM server and then device. Delivery of Push notification is not guaranteed from GCM to device and it is stated as best effort. Once it is delivered on user device, there might be a chance that user clears it without actually Opening the message.
Using App42 Push Analytics, you can track how many push notification was sent from your side, how many were delivered and how many were opened by the user. You can see these analytics from AppHQ console which will give a better insight of push notification campaign.
If you want to track push message read/opened event you have to simply put following snippet after Message is clicked and lands to your game/app. This will enable tracking of push message and analytics can be seen from AppHQ console.
App42API.BuildLogService().SetEvent("Message", "Opened", new Callback());
Once your device is registered for Push Notification you are ready to send multilingual(UTF-8) push message to your app user using following code snippet from any App42 SDK (Android/Java/WP etc)
String userName = "Nick";
String message = "Message which you have to send";
App42Log.SetDebug(true);		//Print output in your editor console
Dictionary<String, String> otherMetaHeaders = new Dictionary<String, String>();
otherMetaHeaders.Add("dataEncoding", "true");
pushNotificationService.SetOtherMetaHeaders(otherMetaHeaders);
pushNotificationService.SendPushMessageToUser(userName,message, new UnityCallBack());
public class UnityCallBack : App42CallBack
{
	public void OnSuccess(object response)
	{
		PushNotification pushNotification = (PushNotification) response;
		App42Log.Console("Message is " + pushNotification.GetMessage());
		App42Log.Console("userName is : " + pushNotification.GetMessage());
	}

	public void OnException(Exception e)
	{
		App42Log.Console("Exception : " + e);
	}
}
For more details of Push Notification Documentation


