
Push Notification helps developer in sending event or alert to app users even when they are not logged into the app. App42 uses APNS (Apple Push Notification Service) and GCM (Google Cloud Messaging) to send Push Notification on IOS/Android devices. To configure Push Notification on Cocos2dx requires some plugin to be written and it is not straightforward, especially if you are new to Push Notification and plugin writing.
To overcome this issue and make this process easier, we have created a plugin that can be used in your project with minimal effort. To make it easy to understand, we have created a Sample Project. Here we will walk you through a step-by-step integration process by taking the examples of the sample we created.
Open Android.mk file from your project and made the following changes in your Android.mk file
Add "../../App42PushHelper/App42PushHelper.cpp" // path in LOCAL_SRC_FILES.
Add "$(LOCAL_PATH)/../../App42PushHelper" // path in LOCAL_C_INCLUDES.
Add Plugin source classes and library files in your sample project:
Open AndroidManifest.xml file & make the following changes, if you are customizing your own Android application.
1.3.1 Add following permission in your AndroidManifest.xml file
   <uses-permission android:name="android.permission.INTERNET" />
    <uses-permission android:name="android.permission.VIBRATE" />

    <uses-permission android:name="android.permission.GET_ACCOUNTS" />

    <uses-permission android:name="android.permission.WAKE_LOCK" />
    <permission
        android:name="com.shephertz.sample.permission.C2D_MESSAGE"
        android:protectionLevel="signature" />

    <uses-permission android:name="com.shephertz.sample.permission.C2D_MESSAGE" />

    <uses-permission android:name="com.google.android.c2dm.permission.RECEIVE" />
1.3.2 Add Receiver component in your Androidmanifest.xml file
     <receiver
            android:name="app42.push.coco.App42GCMReceiverr"
            android:permission="com.google.android.c2dm.permission.SEND" >
            <intent-filter>
                <action android:name="com.google.android.c2dm.intent.RECEIVE" />
                <action android:name="com.google.android.c2dm.intent.REGISTRATION" />
                <category android:name="com.shephertz.sample" />
            </intent-filter>
        </receiver>
1.3.3 Declare Service in your AndroidManifest.xml file
 <service android:name="app42.push.coco.App42GCMService" >
        </service>
1.3.4 Replace “com.shephertz.sample” with your application package name in AndroidManifest.xml file.
1.3.5 Open App42PushHelper.cpp file from App42PushHelper folder & update the Google Project Id as follows:
#define GOOGLE_PROJECT_NUMBER "Your_Google_Project_Number" //Needed for android
After following all the steps mention in this tutorial you can start building your cocos2d-x iOS project by following below steps:
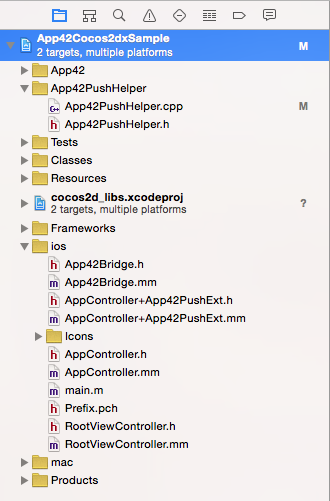
-App42Bridge(.h & .mm)
-AppController+App42PushExt(.h & .mm)
When you are done with above steps, your xcode project navigator should look like:
3.1 Include App42PushHelper.h to class where you want to use the plugin (In the sample we are using it in TestPushNotificationService class) as follows:
#include "App42PushHelper.h"
3.2 Define two callback functions in the class one for getting the device token and other for getting push messages as follows:
/**
 * Callback where you will get device token when device is registered successfully
 */
void TestPushNotificationService::deviceDidRegisteredWithDeviceToken(const char* deviceToken)
{
    log("deviceToken = %s",deviceToken);
}

/**
 * Callback where you will receive push messages
 */
void TestPushNotificationService::didReceivePushNotification(const char* pushMsg)
{
    log("Message = %s",pushMsg);
}
3.3 Set the callback function to receive your push messages already defined in step-2 as follows:
//Add this line in init function of the class you are working as we have added in the sample
App42PushHelper::setPushCallBack(CC_CALLBACK_1(TestPushNotificationService::didReceivePushNotification, this));
3.4 Register your device to APNS/GCM as follows:
App42PushHelper::registerForPush(CC_CALLBACK_1(TestPushNotificationService::deviceDidRegisteredWithDeviceToken, this));
Here we are calling “registerForPush” function of App42PushHelper class. The callback function “deviceDidRegisteredWithDeviceToken” will be called by the plug-in once the device is registered successfully to APNS. You will be getting deviceToken in this function. The above statement can be called whenever you want to register your device for push, normally in the init method of the working class.
3.5 Register your device to App42 Cloud:
When you get device token successfully in the callback “deviceDidRegisteredWithDeviceToken”, you can register your device to App42 Cloud as follows:
/**
 * Callback where you will get device token when device is registered successfully
 */
void TestPushNotificationService::deviceDidRegisteredWithDeviceToken(const char* deviceToken)
{
    registerDeviceToken(deviceToken);
}

void TestPushNotificationService::registerDeviceToken(const char *deviceToken)
{
    PushNotificationService *pushService = App42API::BuildPushNotificationService();
    const char* userName = "Shephertz";
    DeviceType deviceType = APP42_IOS;
    pushService->RegisterDeviceToken(deviceToken, userName, deviceType, app42callback(TestPushNotificationService::onPushRequestCompleted, this));
}
Using API
Once your app is registered you are ready to send message to your app user using following code snippet from any App42 Cocos2D-X SDK.
	const char* userName = "Nick";
	const char* message = "Message which you have to send";
	pushService->SendPushMessageToUser(userName,message,this, app42callfuncND_selector(Sample_Class::onPushRequestCompleted));
Using AppHQ Console
You can also send push messages to your registered app user directly from AppHQ console. To do this follow the simple steps:
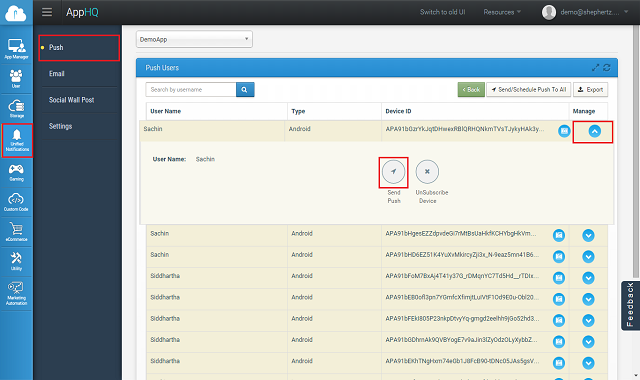
Type your message, once you are done click on send button as show below. This will trigger a push notification message to your app user
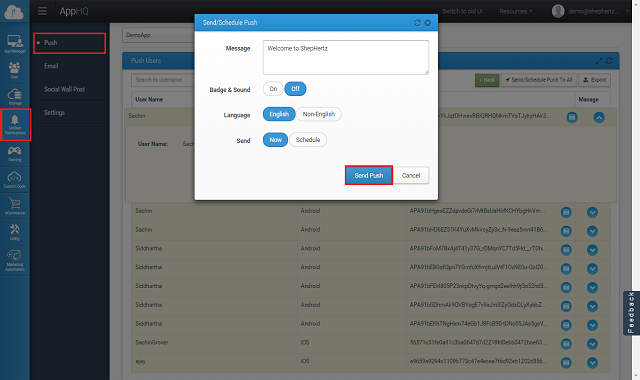
If you want to send push message with sound and badge effect on iOS device, you have to pass JSON string in below format.
	const char* userName = "Nick";
	const char* message = "Message which you have to send";
	pushService->SendPushMessageToUser(userName,message,this, app42callfuncND_selector(Sample_Class::onPushRequestCompleted));
You can also do it from AppHQ by putting this JSON format in message text area for sending message to iOS device with sound and badge effect.
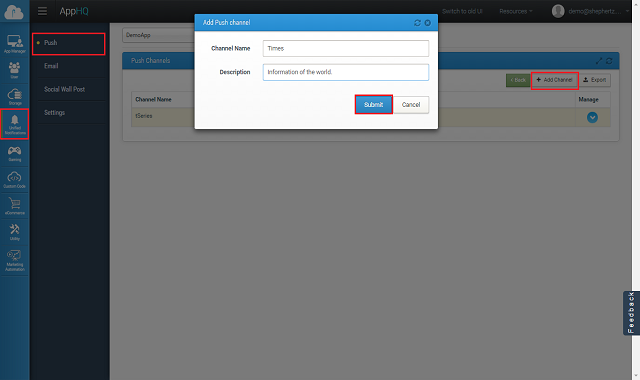
App42 Push notification also supports channel subscription model where user can subscribe on channel of his interest to receive the notification. You can send message to channel which will deliver message to all users who are subscribed to that channel. A channel can be created from AppHQ console. To do this follow the simple steps:
Once channel is created you can ask user for subscription on the channel. Below is the code snippet for the same
Here is Cocos2D-X Code to send Push Notification to Channel.
const char* channel = "News Channel";
const char* description = "Channel all about the news";
//User must be registered with App42 for Push Notification
const char* userName = "Nick";
//Create Channel
pushService->CreateChannel(channel,description, this, app42callfuncND_selector(Sample_Class::onPushRequestCompleted));
//Subscribe user to that channel
pushService->SubscribeToChannel(channelName,userName, this, app42callfuncND_selector(Sample_Class::onPushRequestCompleted));
// Now send message on the Channel
const char* message = "Message which you have to send";
pushService->SendPushMessageToChannel(channelName, message, this, app42callfuncND_selector(Sample_Class::onPushRequestCompleted));
App42 Push Notification Service has introduced API to target users who have specific profile/preference. This API requires user preference or profile persistence in Storage Service as a prerequisite. To identify a specific user segmentation, your app user profile or preference information should be saved on App42 cloud e.g. if you are building a music streaming app and you want to send push notifications to all those users who like Rock music, you should have preference of user stored in App42 cloud already and it can be done using Storage Service as shown below.
Saving User Preference
//Set Logged in User Name
App42API::setLoggedInUser("USER_NAME");
const char* dbName = "<Your_DataBase_Name>";
const char* collectionName = "<Your_Collection_Name>";
string json = "{\"preference\":\"Rock\",\"age\":30,\"company\":\"ShepHertz\"}";
storageService->InsertJsonDocument(dbName, collectionName, jsonDoc, this, app42callfuncND_selector(Sample_Class::onStorageRequestCompleted));
Sending Push to Segmented User
Once your app user’s profile/preference information is saved, you can send Push Notification to the segmented user who meets specific criteria (Assuming your app user is already subscribed for push notification. For example, here you can send Push Notification to segmented users who likes Rock music as explained below.
const char* message= "Message which you have to send";
const char* key = "name";
const char* value = "Nick";
Query *query = QueryBuilder::BuildQuery(key, value, APP42_OP_EQUALS);
pushService->SendPushToTargetUsers(message.c_str(), dbName, collectionName, query, this, app42callfuncND_selector(Sample_Class::onPushRequestCompleted));
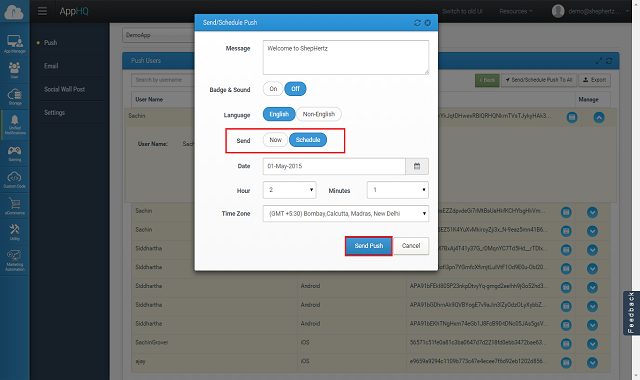
You can also schedule message to your app user on specified time from AppHQ console. To do this follow the simple steps:
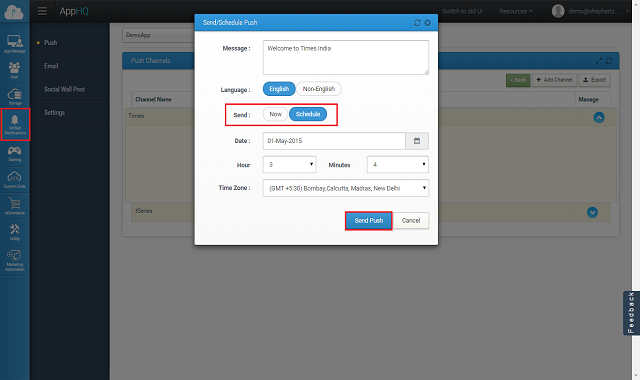
Message scheduling on channel can be done in similar way. To do this follow the simple steps:
Once your device is registered for Push Notification you are ready to send multilingual(UTF-8) push message to your app user using following code snippet from any App42 SDK (Android/Java/WP etc)
const char* userName = "Nick";
const char* message = "Message which you have to send";
map<string,string> otherMetaHeaders;
otherMetaHeaders["dataEncoding"] = "true";
pushService->setOtherMetaHeaders(otherMetaHeaders);
pushService->SendPushMessageToUser(userName,message,this, app42callfuncND_selector(Sample_Class::onPushRequestCompleted));

void Sample_Class::onPushRequestCompleted(App42CallBack *sender, void *response)
{
    App42PushNotificationResponse *pushResponse = (App42PushNotificationResponse*)response;
    printf("\ncode=%d",pushResponse->getCode());
    printf("\nResponse Body=%s",pushResponse->getBody().c_str());
    if (pushResponse->isSuccess)
    {
        for(std::vector<App42PushNotification>::iterator it = pushResponse->notifications.begin(); it != pushResponse->notifications.end(); ++it)
        {
            printf("\n UserName=%s",it->userName.c_str());
            printf("\n Message=%s\n",it->message.c_str());
            printf("\n Expiry=%s\n",it->expiry.c_str());
        }
    }
    else
    {
        printf("\nerrordetails:%s",pushResponse->errorDetails.c_str());
        printf("\nerrorMessage:%s",pushResponse->errorMessage.c_str());
        printf("\nappErrorCode:%d",pushResponse->appErrorCode);
        printf("\nhttpErrorCode:%d",pushResponse->httpErrorCode);
    }
}
For more details of Push Notification Documentation


