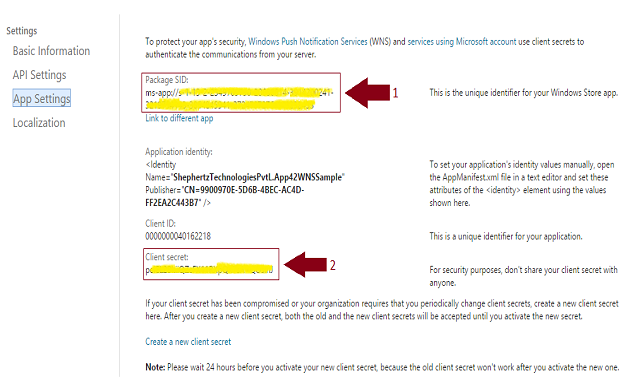
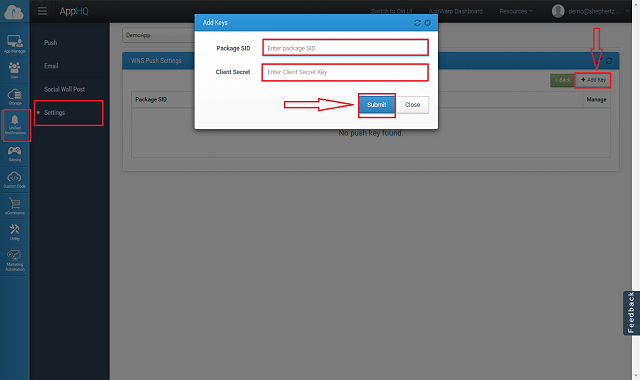
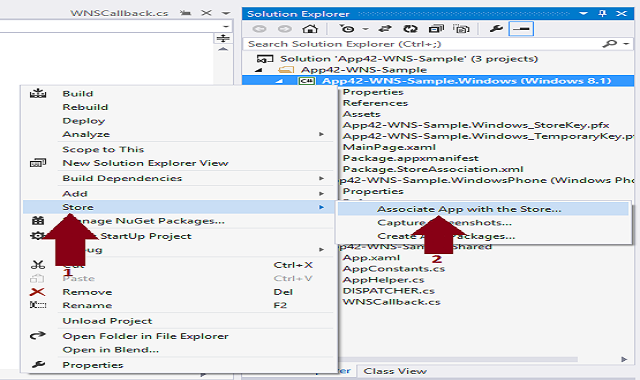
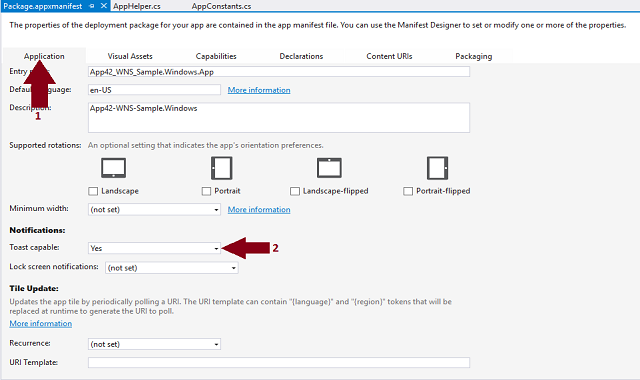
Push Notification helps you in sending event or alert to your app users even when they are not logged into the app. App42 uses WNS (WIndows Push Notification Service) in order to send Push Notifications to your Windows Store App, your app must be registered with the Windows Store. This process requires a Windows Store developer account. You can send push notifications from AppHQ UI console as well as can use APIs to send and schedule Push notification to your app users. App42 also gives you interesting insight about analytics of push messages too. Here are the few easy steps to get started with App42 Push Notification using a sample project in a few minutes.

 public const String apiKey = "APP_API_KEY"; // Apikey from AppHQ console.
 public const String secretKey = "APP_SECRET_KEY"; // SecretKey from AppHQ console.
 public const String userName = "UserName"; // UserName for which device has to be registered.
PushNotificationChannel channel = null;
String channelURI = null;
try
{
   channel = await PushNotificationChannelManager.CreatePushNotificationChannelForApplicationAsync();
   channelURI = channel.Uri;
   channel.PushNotificationReceived += OnPushNotification; // Calling Push notification listener.
}

catch (Exception ex)
{
   // Could not create a channel.
}
 PushNotificationService pushNotificationService = null;
 public YourMainClassConstructor()
 {
	// Initializing App42.
	App42API.Initialize(AppConstants.apiKey, AppConstants.secretKey);
	// Initializing PushNotification Service.
	pushNotificationService = App42API.BuildPushNotificationService();
 }
pushNotificationService = App42API.BuildPushNotificationService();
String userName = "UserName";
pushNotificationService.StoreDeviceToken(userName, channelURI, new WNSCallback()); // Here User name is identification to whom you want to register,
// you can also use device id in place of UserName if you don't have
// username in your app.

class WNSCallback : App42Callback
{

	public void OnException(App42Exception exception)
	{
		System.Diagnostics.Debug.WriteLine(":::EXCEPTION ::: " + exception.ToString());
	}

	public void OnSuccess(object response)
	{
		System.Diagnostics.Debug.WriteLine(":::SUCCESS ::: " + response.ToString());
	}
}
Your app is registered you are ready to send push messages to your app users using following code snippet from any App42 SDK. Below is the snippet for App42 WinRT SDK. If you want to send it from other SDK you can do it in the same way.
public void SendToast()
{
	String userName = "UserName";
	String toastTitle = "ToastTitle";
	String toastContent = "ToastContent";
	Dictionary<string, object> toastParams = new Dictionary<string, object>();
	toastParams.Add("param1", "Value1");
	toastParams.Add("param2", true);
	toastParams.Add("param3", 1000);
	pushNotificationService.SendPushToastMessageToUser(userName, toastTitle, toastContent, toastParams, new WNSPushCallback());
}

class WNSPushCallback : App42Callback
{
	public void OnException(App42Exception exception)
	{
		System.Diagnostics.Debug.WriteLine(":::EXCEPTION ::: " + exception.ToString());
	}

	public void OnSuccess(object response)
	{
		System.Diagnostics.Debug.WriteLine(":::SUCCESS ::: " + response.ToString());
	}
}
public void SendTile()
{
	String userName = "UserName";
	Tile tile = new Tile();
	tile.Title = "TileTitle";
	tile.Content = "TileContent";
	tile.BadgeCount = "2";
	tile.BackgroundImage = "Image_Url";
	pushNotificationService.SendPushTileMessageToUser(userName, tile, new WNSPushCallback());
}

class WNSPushCallback : App42Callback
{
	public void OnException(App42Exception exception)
	{
		System.Diagnostics.Debug.WriteLine(":::EXCEPTION ::: " + exception.ToString());
	}

	public void OnSuccess(object response)
	{
		System.Diagnostics.Debug.WriteLine(":::SUCCESS ::: " + response.ToString());
	}
}
 private void OnPushNotification(PushNotificationChannel sender, PushNotificationReceivedEventArgs e)
        {
            String notificationContent = String.Empty;
            switch (e.NotificationType)
            {
                case PushNotificationType.Badge:
                    notificationContent = e.BadgeNotification.Content.GetXml();
                    System.Diagnostics.Debug.WriteLine("Badge recieved :: " + notificationContent);
                    BadgeNotification badge = new BadgeNotification(e.BadgeNotification.Content);
                    BadgeUpdateManager.CreateBadgeUpdaterForApplication().Update(badge);
                    break;
                case PushNotificationType.Tile:
                    notificationContent = e.TileNotification.Content.GetXml();
                    System.Diagnostics.Debug.WriteLine("Tile recieved :: " + notificationContent);
                    TileNotification tileNotification = new TileNotification(e.TileNotification.Content);
                    TileUpdateManager.CreateTileUpdaterForApplication().Update(tileNotification);
                    break;
                case PushNotificationType.Toast:
                    notificationContent = e.ToastNotification.Content.GetXml();
                    System.Diagnostics.Debug.WriteLine("Toast recieved :: " + notificationContent);
                    ToastNotification toast = new ToastNotification(e.ToastNotification.Content);
                    ToastNotificationManager.CreateToastNotifier().Show(toast);
                    break;
                case PushNotificationType.Raw:
                    notificationContent = e.RawNotification.Content;
                    System.Diagnostics.Debug.WriteLine("Raw recieved :: " + notificationContent);
                    break;
                default:
                    System.Diagnostics.Debug.WriteLine("Unknown notification type recieved :: " + e.NotificationType);
                    break;
            }
            e.Cancel = true;
        }
    }
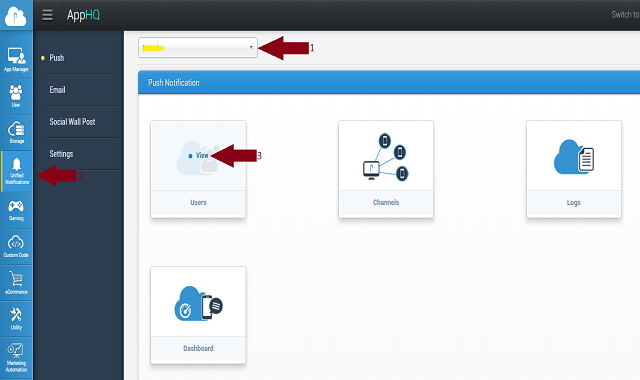
You can also send push messages to your registered app user directly from AppHQ console. To do this follow the simple steps:
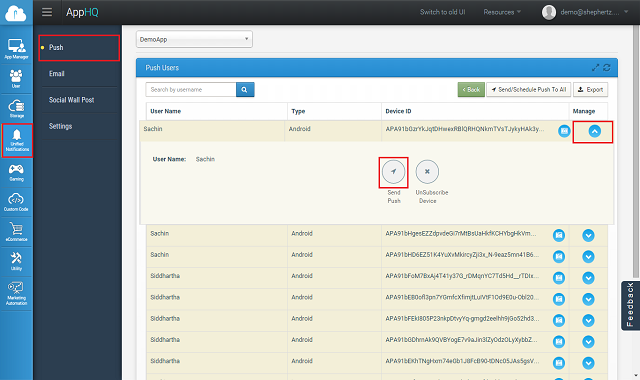
Type your message, once you are done click on send button as show below. This will trigger a push notification message to your app user
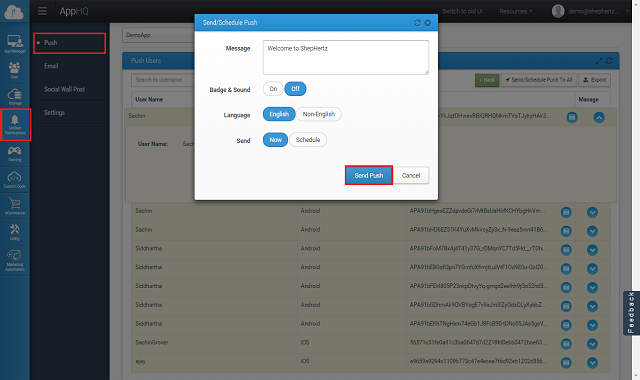
Once you are done click on send button. This will trigger a push notification message to your app user. You can also send tile notification from AppHQ by sending JSON formatted string e.g
{"tile":{"title":"Message","count":2,"backgroundImage":"<Your_remote_image_path>","backBackgroundImage":"Your_remote_image_path>","backTitle":"title","backContent":"content"}}
App42 Push notification also supports channel subscription model where user can subscribe on channel of his interest to receive the notification. You can send message to channel which will deliver message to all users who are subscribed to that channel. A channel can be created from AppHQ console. To do this follow the simple steps:

Once channel is created you can ask user for subscription on the channel. Below is the code snippet for the same
//
// First Subscribe User to Channel
//
String channelName = "cricket channel";
String userName = "Nick";
pushNotificationService.SubscribeToChannel(channel,userName,this);
//
// Now send message on the Channel
//
String channelName = "cricket channel";
String message = "Mumbai Indians won IPL 6";
pushNotificationService.SendPushMessageToChannel(channelName,message,this);
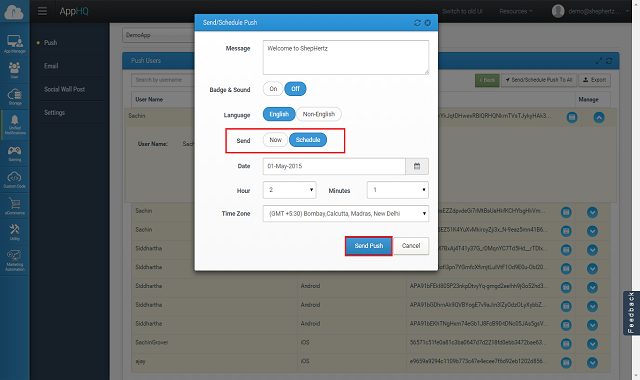
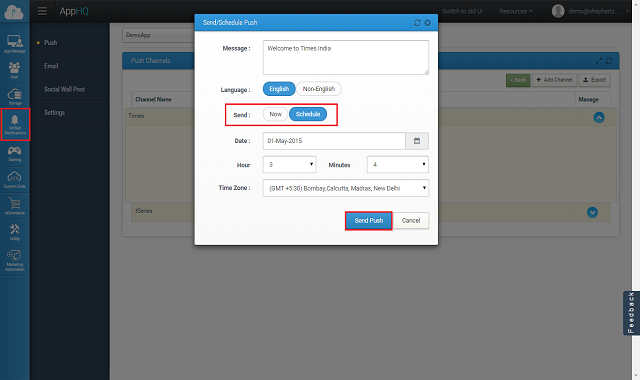
You can also schedule message to your app user on specified time from AppHQ console. To do this follow the simple steps:
Message scheduling on channel can be done in similar way. To do this follow the simple steps:
Once your device is registered for Push Notification you are ready to send multilingual(UTF-8) push message to your app user using following code snippet from any App42 SDK (Android/Java/WP etc)
String userName = "Nick";
String message = "Message which you have to send";
Dictionary<String, String> otherMetaHeaders = new Dictionary<String, String>();
otherMetaHeaders.Add("dataEncoding", "true");
pushNotificationService.SetOtherMetaHeaders(otherMetaHeaders);
pushNotificationService.SendPushMessageToUser(userName,message,new Callback());
public class Callback : App42Callback
{
	 public void OnException(App42Exception exception)
	  {
		Console.WriteLine("Exception Message : " + exception);
	  }
	  public void OnSuccess(Object response)
	  {
		 PushNotification pushNotification = (PushNotification) response;
		 String jsonResponse = pushNotification.ToString();
	  }
}
For more details of Push Notification Documentation


