Push Widget

APNs Push Configuration

Push Notification helps you in sending event or alert to your app users even when they are not logged into app. App42 uses APNS (Apple Push Notification Service) to send Push Notification on iOS devices.

Setup Your APNs Project

To configure Push Notifications for iOS Apps/Games, the prerequisites are :

  • An iOS Developer Program membership on iOS Dev Center
  • An iPhone/iPad.
  • A Server, and this is where App42 Push Service comes into the picture.

Once you have all, you need to generate AppID and SSL certificate on iOS Developer portal, .p12 file and a provisioning profile configured for push notification. This guide will walk you through all the necessary steps needed to configure your app for push notification.

1 Generating Certificate Signing Request

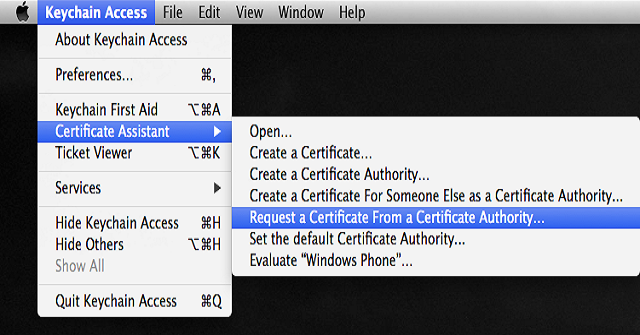
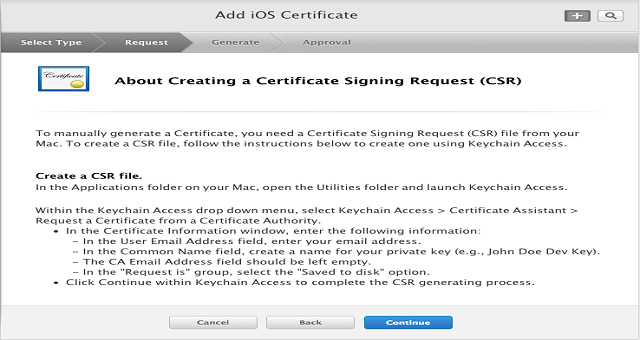
To manually generate the certificate, Certificate Signing Request (CSR) file is needed from your MAC that will be used to authenticate the creation of SSL certificate.

To create CSR file, please follow the steps mentioned below:

  • Open Keychain Access(Applications->Utilities->Keychain Access)
  • Choose the menu option “Keychain Access -> Certificate Assistant -> Request a Certificate From a Certificate Authority…” and make sure no private key is selected in the main Keychain Access window.

RequestCSR

  • Enter your Email Address and Common Name and check Saved to disk and click Continue to save it to your prefered location.

CertficateAssistant

2 Creating App ID

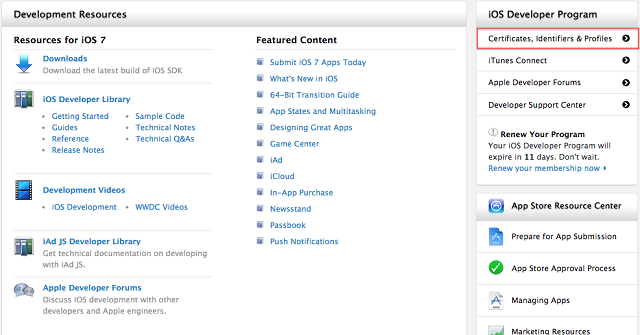
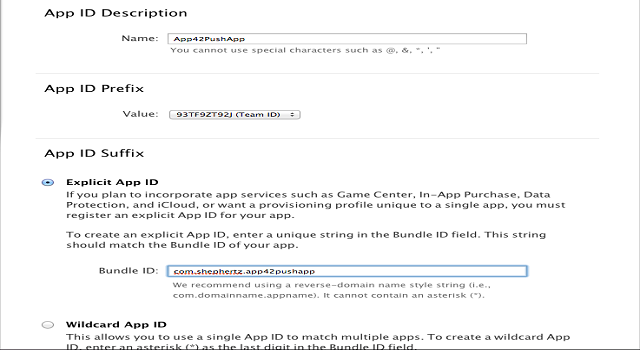
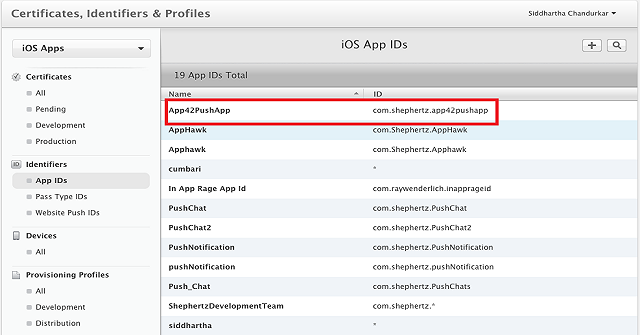
To install an application on your device, you need to create an App ID and you do this on iOS Dev Center .

DeveloperResource

  • Select Identifiers in the presented screen :

Identifiers

  • Click on the + button at the upper right corner of the presented screen:

AppIds

  • Enter the name for new AppID under App ID Description.
  • Select App ID Prefix.
  • Select Explicit App ID option under App ID Suffix and enter the Bundle ID.

AppIDDescription

  • Enable Push Notification for this App ID by selecting the checkbox next to Push Notifications under App Services.
  • Select Continue and Confirm all the details are correct in the presented screen such as App ID description, Bundle Identifier and Push Notifications Checkbox and Select Submit button to finish the App ID creation.

AppServices

3 Creating SSL Certificate

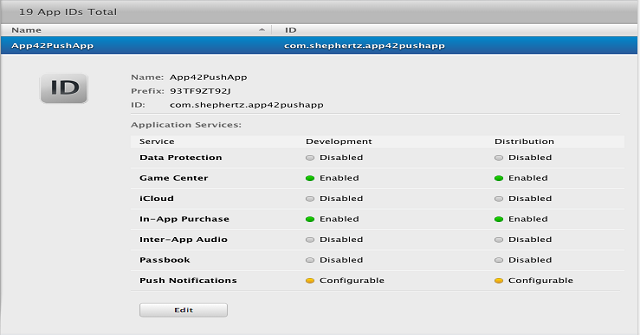
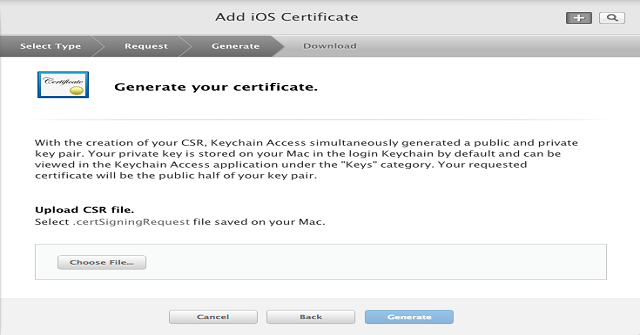
Now we will generate SSL certificate that is needed to make a secure connection between the App42 Push Server and APNS. This certificate will be linked to the App ID you just created so that the App42 Server will send push notifications to this particular app only.

  • Select App IDs under Identifiers that shows list of app ids and select your newly created App ID i.e. App42PushApp.

AppIDSelection

  • Select Edit button in the presented screen.

EditAppID

  • Scroll down to Push Notifications to create SSL certificate.
  • Select Create Certificate under Development SSL Certificate as we are creating for development environment.

CreateCertificate

  • Next you will be guided to Add iOS Certificate screen where you will be asked to create Certificate Signing Request(CSR) that we have created already under Section-1 and hence Select Continue.

AddiOSCertificate

  • Next you will be asked to upload the CSR file. Select the Choose File and browse to .certSigningRequest file and Click Open then Click Generate to generate the SSL certificate.

UploadCSR

  • It may take few seconds to generate the certificate. Once generated, click Download to download the certificate. I recommend to store all the generated files in the single folder as it will be easy to locate the files later.

DownloadCertificate

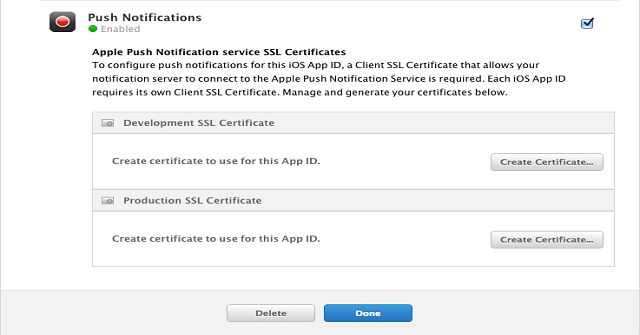
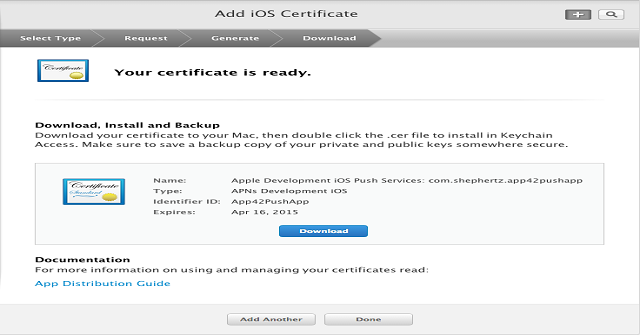
Now you have a valid certificate for sending push notification in development environment, If you need this for Production environment, repeat the same process for the Production.

4 Creating .p12 file:
  • Now locate the SSL certificate file that you just downloaded and double click to install it to your Keychain Access.
  • Now Open Keychain Access -> My Certificates(Under Category section)and Right Click on the certificate you just installed and choose Export.

ExportCertificate

  • Enter the filename and select the location to save and click Save.

p12

  • Enter the export Password when asked. You may be asked to enter your system account password to allow Keychain Access to export the certificate from your Keychain.
  • Make your .p12 file compatible with APP42 server by following the below mentioned steps:

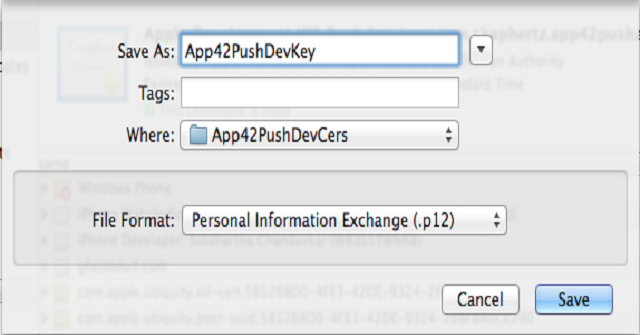
a. Keep your .cer file and .p12 file in a single folder

b. Open terminal and go to the folder that has both the files $ cd “your folder path”

c. Now execute the following commands in the terminal :

openssl x509 -in aps_development.cer -inform DER -out developer_identity.pem -outform PEM
openssl pkcs12 -nocerts -in App42PushDevKey.p12 -out App42PushDevKey.pem
openssl pkcs12 -export -inkey App42PushDevKey.pem -in developer_identity.pem -out iphone_dev.p12

Where, aps_development.cer <= SSL Certificate you downloaded from Apple in Step 3 and App42PushDevKey.p12 <= The .p12 file you just created above.

5 Generating the Provisioning Profile

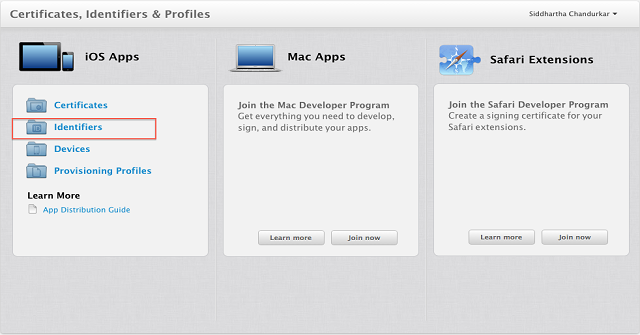
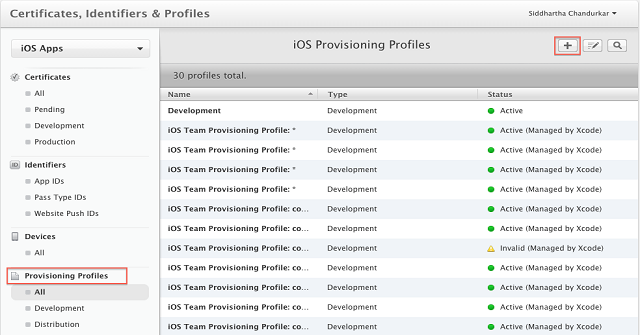
Go to iOS Dev Center and select Certificates, Identifiers & Profiles . Select Provisioning Profile option from the sidebar and select + button.

ProvisionalProfile

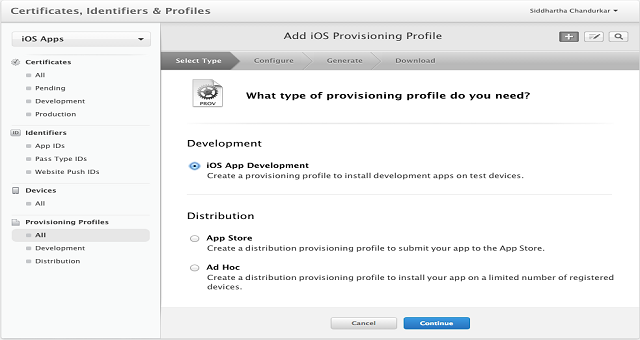
Now you have to follow a 4-step Add iOS Provisioning Profile wizard

Step-1 : Select Type

Select iOS App Development under Development and then click Continue.
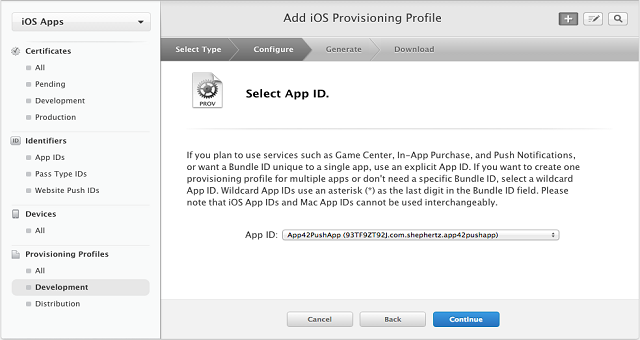
ProfileTypeSelection

Step-2 : Configure

Select the App ID you created earlier in section-2 of this tutorial for me it is “App42PushApp” and click Continue.

ProvisionAppID

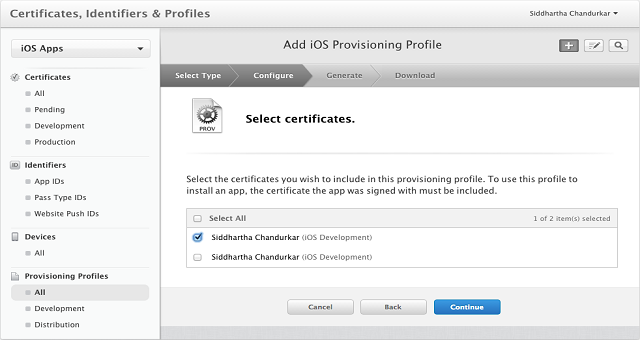
Step-2.1 Select Certificates :

Select the certificates from the list provided to include in this provisional profile and click Continue.

SelectCertificate

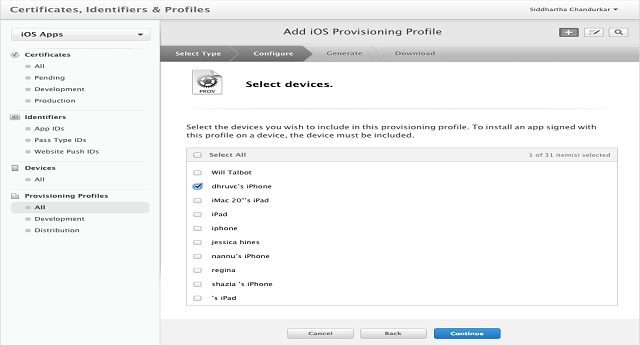
Step-2.2 Select Devices :

Select the devices you wish to include in this provisioning profile and click Continue.
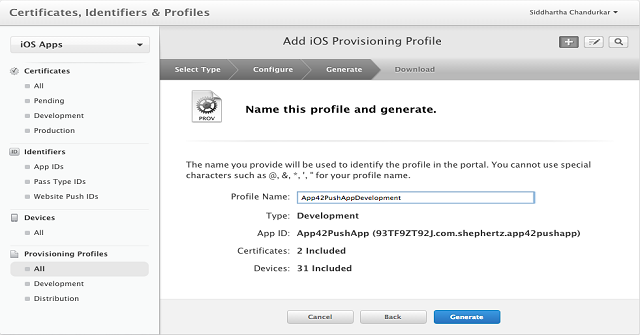
SelectDevices

Step-3 : Generate

Enter a meaningful name for this provisioning profile in field Profile Name.This will be used to identify the profile in the portal. Now click Generate.
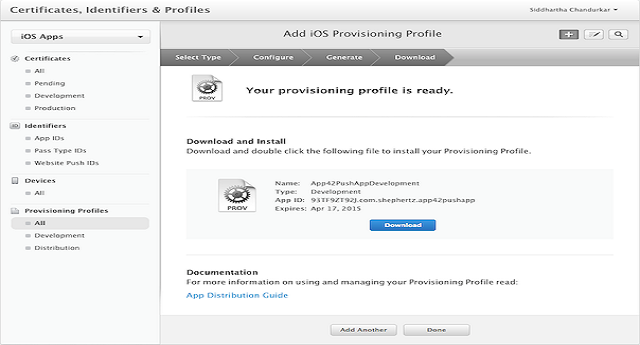
GenerateProfile

Step-4 : Download

Select Download to download the generated profile. Add the profile to Xcode by double clicking on it and You are done.

DownloadProfile

Note:- Repeat the process to generate the Ad Hoc / App Store profile, the only difference is, select the Select Type as Ad Hoc / App Store instead of Development in the Step-1.

6 Configuring your App42 Cloud API App for Push Notification

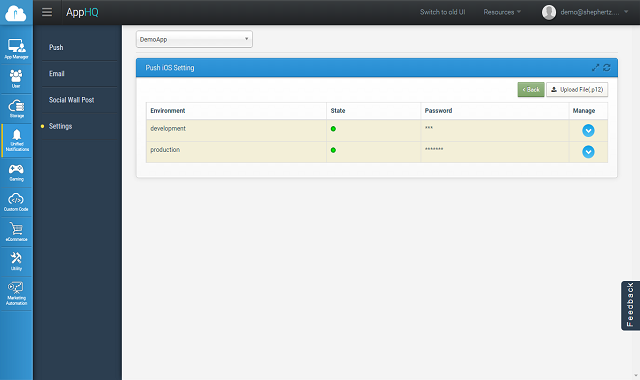
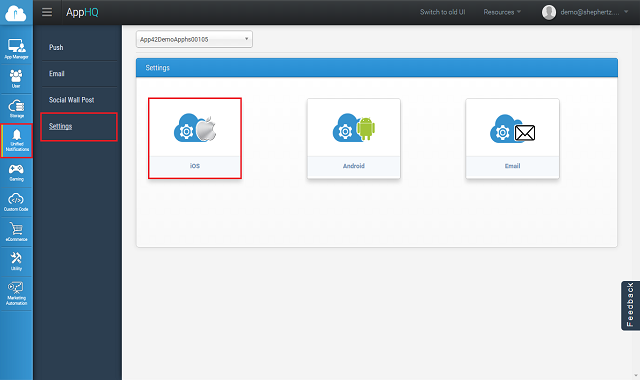
To send Push Notification using App42 Cloud API, you have to upload the iphone_dev.p12 file, that you created in step-4, to AppHQ Console.

  • Register with App42 platform
  • Create an app once you are on Quick-start page after registration.
  • If you are already registered, login to AppHQ console , create an app from App Manager -> App Create link and select Unified Notification in AppHQ Menu.
  • Select iOS in Settings as shown in the below image:

iOSPushSettingsLayOUT

  • Select your App Name from the drop down menu.
  • Click on Upload File(.p12) button and browse your iphone_dev.p12 file by clicking ‘choose file’ option to upload the file.
  • Enter password given during creation of the iphone_dev.p12 file.
  • Select the environment from the drop down menu.
  • Click on the submit button and it’s done here.

UploadP12

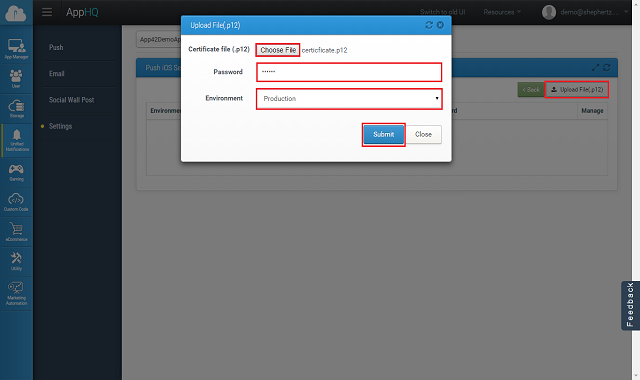
Repeat the same process to configure App42 Cloud API App for Push when it is ready for distribution, except selecting production environment from Environment option from the drop down menu.

Note:- Environment drop-down menu has two options development and production. You can upload two .p12 files one for each environment. But we recommend to have only one active push profile at a time.

MultipleP12