Automation of Push Campaign
Automation of Push Campaign is essential part for any App marketing and should take minimal effort in creating it. App42 Marketing Automation enables you to create these campaign with few clicks and without writing any code for automation on the client side. For example, Creating Campaign for In-Active Users who have Installed your app, but not opened it from last 5 days or in E-Commerce application, sending automated Push to users who have added item in the cart, but the purchase still pending. Your app should capture all required events on which you want to do the automation and Push Notification should also be integrated along it before you start creating Campaign. ( Please see details for Capturing Events and Integrating Push Notification before you start )
Below are the steps to create Automated Campaign. We have taken the abandoned cart Example of E-Commerce application where AddToCart and Payment are two events are getting Captured in the app. However these events could be anything based on the nature of your app:
- Login to Marketing Automation Console from here
- Navigate to Define > Segments.
- Click on Create Segment and Create Your Segment by selecting the Event. This will create Segmented Users who have performed selected Event. For this Example, create two different Segments one is AddToCart (Users who have done Add to Cart in the app) and another is Payment (Users who have done Payment in the app) Segment as shown in the below image:

Once segment is created, navigate to Campaign > Push and click on Create Push Campaign. Enter the required details as below:
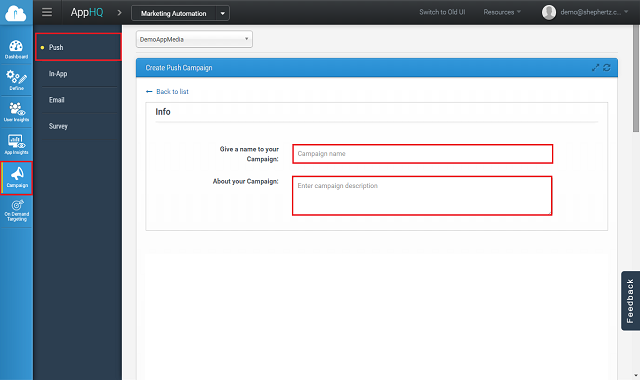
Info
It requires following information to be entered as explained below:
- Campaign Name * : Name of Campaign
- Description : Description of Campaign.
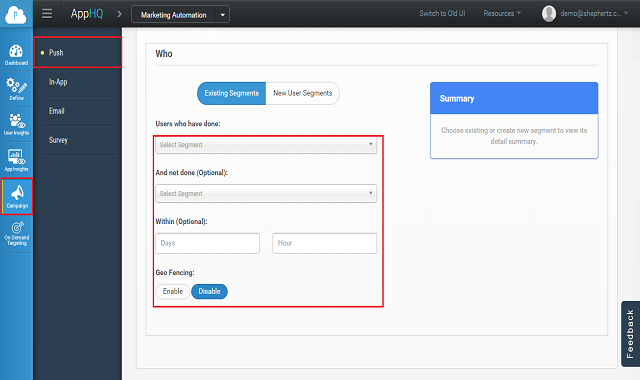
Who
Who section basically stands for segmented users:
- Choose Segment :* Choose your User Segmentation. (See How to Create User Segmentation) from existing segments or you can create a new user segment.
- And not done (Optional) : Now select Next Segment of users (And Not Done Option) who have not done Selected Event after given amount of time. In this Example, Payment Segment will be chosen to create abandoned cart example.
- Within (Optional) : Configure time after which you want to send Push Notification (After How Many Days/Hour Option)
- Geo Fencing : You can also choose Geo fencing to show Notification to users only if they enter in that region. However this can be used if you want to create a campaign for users if he enters in particular region, then only Push notification should be triggered. For example, users who have not completed purchase, Push notification should be triggered once they entered to Oxford Street London.
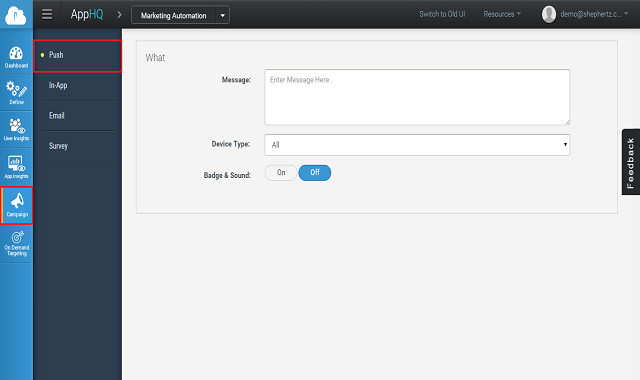
What
- Message :* Message which you want to configure for Push Campaign
- Device Type : Type of device, if you want to configure it specific one.
- Badge & Sound : No of badge count, if you want to show effects on device
When
- Start Date * : Date at which you want to Kick off this Campaign
- End Date * : Date at which this Campaign will end
- Recurrence Interval * : Frequency at which Notification will be triggered. This could be daily, monthly, only once during life time of Campaign etc.
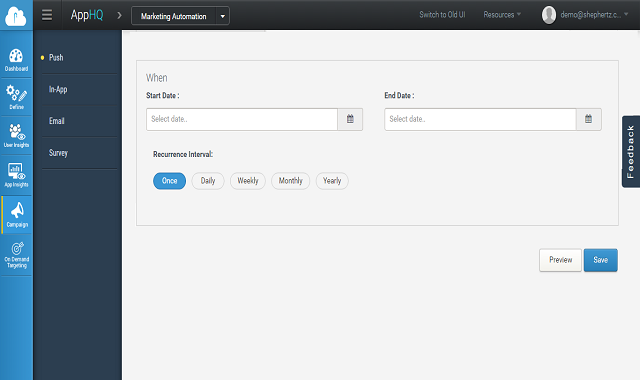
Finally click on Save button and you are done with the Campaign. This campaign will be pushed to all users once they open the app next time and will run based on the segment and rule that you configured in above steps.


