App42 platform has various technical and business services using which app development can be done without writing a single line of backend code. However there might be a case where the app developer might need to have some server side custom code for their app. There could be multiple scenarios for example-
package com.shephertz.app42.paas.customcode.sample;
//Your Custom Code Class
public class MyCustomCode implements Executor {
private ServiceAPI sp = new ServiceAPI("YOUR_APIKEY","YOUR_SECRETKEY");
private final int HTTP_STATUS_SUCCESS = 200;
private String moduleName = "App42CustomCodeTest";
/**
* Write your custom code inside this method
*/
@Override
public HttpResponseObject execute(HttpRequestObject request) {
		JSONObject body = request.getBody();
		// Build Log Service For logging in Your Code
		LogService logger = sp.buildLogService();
		logger.debug(" Recieved Request Body : :" + body.toString(), moduleName);

		// Write Your Custom Code Here
		// ......//

		logger.info("Running Custom Code ", moduleName);
		// Create JSON Response Based on Your business logic
		JSONObject jsonResponse = new JSONObject();
		try {
			jsonResponse.put("status", "success");
			jsonResponse.put("message", "From Custom Code");
		//....//
		} catch (JSONException e) {
			// Do exception Handling for JSON Parsing
		}
		// Return JSON Response and Status Code
		return new HttpResponseObject(HTTP_STATUS_SUCCESS, jsonResponse);
	}
}
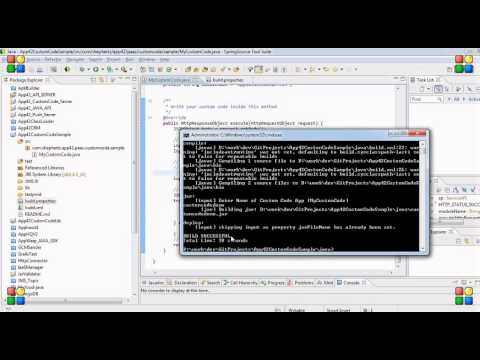
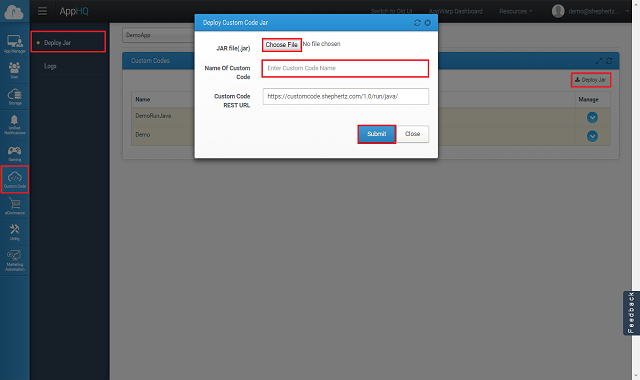
You can also deploy your server side custom code from AppHQ console. To deploy it, your custom code class should be wrapped onside jar file. You can use any java utility to create jar file of your code. Once your jar file is ready, you can deploy it from dashboard using Custom Code:
Once your code is deployed successfully, you should be able to see it in service listing option under Custom Code panel in dashboard as shown below.

Once your custom code service is deployed, it can be accessed through App42 SDKs available in different languages using Custom Code Service and calling runJavaCode on it. Example of Calling Custom code from Android/JAVA SDK is shown below
String name = "DEPLOYED_CUSTOM_CODE_NAME";
JSONObject jsonBody = new JSONObject();
jsonBody.put("Company", "Shephertz");
customCode.runJavaCode(name,jsonBody,new App42CallBack() {
public void onSuccess(Object response)
{
	JSONObject  res= (JSONObject)response;
	System.out.println("response is " + res) ;
}
public void onException(Exception ex)
{
	System.out.println("Exception Message"+ex.getMessage());
}
});
NSString *name = @"DEPLOYED_CUSTOM_CODE_NAME"; NSDictionary *requestBody = [NSDictionary dictionaryWithObjectsAndKeys:@"Company",@"Shephertz", nil]; App42Response *response = = [customCodeService runJavaCode:name requestBody:requestBody]; NSString *jsonResponse = [response toString];String name = "DEPLOYED_CUSTOM_CODE_NAME"; JObject jsonBody = new JObject(); jsonBody.Add("Company", "Shephertz"); customCodeService.RunJavaCode(name, jsonBody, new Callback()); public class Callback : App42Callback { public void OnException(App42Exception exception) { Console.WriteLine("Exception Message : " + exception); } public void OnSuccess(Object response) { JObject json = (JObject) response; String jsonResponse = json.ToString(); } }String name = "DEPLOYED_CUSTOM_CODE_NAME"; JSONObject jsonBody = new JSONObject(); jsonBody.put("Company", "Shephertz"); JSONObject response = customCodeService.runJavaCode(name, jsonBody); System.out.println("response is " + response);Not AvailableString name = "DEPLOYED_CUSTOM_CODE_NAME"; JSONObject jsonBody = new JSONObject(); jsonBody.put("Company", "Shephertz"); JSONObject response = customCodeService.runJavaCode(name, jsonBody); System.out.println("response is " + response);String name = "DEPLOYED_CUSTOM_CODE_NAME"; JObject jsonBody = new JObject(); jsonBody.Add("Company", "Shephertz"); App42Log.SetDebug(true); //Print output in your editor console customCodeService.RunJavaCode(name, jsonBody, new UnityCallBack()); public class UnityCallBack : App42CallBack { public void OnSuccess(object response) { JObject objecti = (JObject)response; App42Log.Console("objectName is : " + objecti["name"]); App42Log.Console("Success : " + response); } public void OnException(Exception e) { App42Log.Console("Exception : " + e); } }String name = "DEPLOYED_CUSTOM_CODE_NAME"; JObject jsonBody = new JObject(); jsonBody.Add("Company", "Shephertz"); JObject response = customCodeService.RunJavaCode(name, jsonBody); Console.WriteLine("response is " + response);NANAvar name:String = "DEPLOYED_CUSTOM_CODE_NAME"; var jsonObject:Object = new Object; jsonObject.Company = "Shephertz"; customcodeService.runJavaCode(name,jsonObject,new callback()); public class callback implements App42CallBack { public function onException(exception:App42Exception):void { trace("Exception Message " + exception); } public function onSuccess(response:Object):void { trace("Response is :" + Util.toString(response)); trace("Object Name is:"+Util.toString(response.name)); } }Coming Soon
You can also schedule server side custom code if you require to use it as scheduled job on server side instead of calling from API. Here are the steps to schedule server side custom code from AppHQ console.
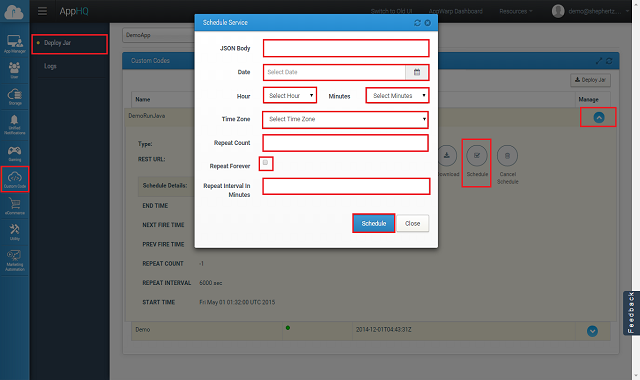
JSON Body : JSON to be passed as input to your code (non-mandatory)
Date : Date for your custom code job execution
Time : Time for job execution
Time Zone : Time Zone in which you have passed the above two values i.e. date and time
Repeat Count : How many times your job should run after first execution. Pass 0 if you want to run it only one time otherwise pass increment from first execution.
Repeat Forever : Select if you want your job to be run always. This will be equivalent to infinite repeat count value.
Repeat Interval : Interval in seconds between consecutive job execution time.
Once you are done with above details, click on Schedule button.
Once your code is scheduled you should be able to see scheduled service details like next fire time, previous fire time, repeat count, and interval defined as shown below.
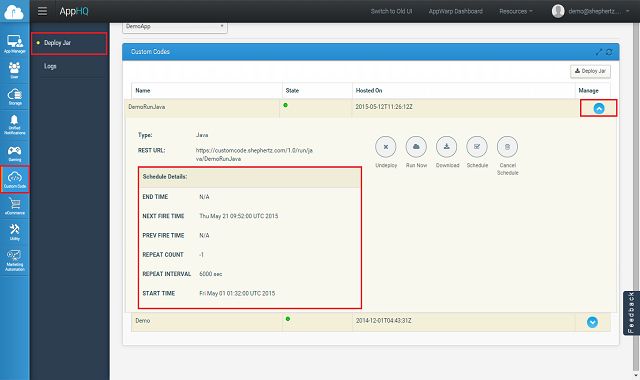
You can cancel your schedule job any time by clicking on Cancel Schedule button in top menu in center panel. Also, you can check scheduled job logs under Scheduling Logs option.
Watch complete video on YouTube