
Enabling push notification on the Android platform while building on Unity is not straightforward, especially if you are not from Android background. App42 makes this task seamless for unity developer and this can be done with minimal effort without prior knowledge of the Android platform.
App42 uses GCM (Google Cloud Messaging) to send Push Notification on Android devices. You can send push notifications from UI console as well as can use APIs to send and schedule Push notification to your app users. App42 also gives you interesting insight about analytics of push messages too
This tutorial uses a sample app to give you a walk-through of integration. Here are the few easy steps to get started with an App42 Android Push Notification in Unity Applications.
App42Push.cs will do all the stuff for you seamlessly. Once app will get started it will register your app with GCM as well as with App42 platform for push notification usage. It uses StoreDeviceToken method to register app with App42 server. This is one time activity and will be done when app will be opened.
If you want to go into detail about the sample code, please see PushSample.cs file in the Assets\Plugins\App42Push\demo folder of sample project. In which user first register his device on GCM and after getting registrationId from Native, user registers on App42 platform to receive Push Notification in Unity App. Unity code snippet defined in PushSample.cs file of sample project is shown below
Initialization on Start-up
Following snippet of PushSample will do the initialization and calls for Registration with GCM and App42 server on start up.
void Start ()
{
	DontDestroyOnLoad (transform.gameObject);
	App42API.Initialize(ApiKey,SecretKey);
	App42API.SetLoggedInUser(UserId);
	//Put Your Game Object Here implemented App42NativePushListener in this Script
	App42Push.setApp42PushListener (this);
	#if UNITY_ANDROID
		App42Push.registerForPush (GoogleProjectNo);
		message=App42Push.getLastPushMessage();
	#endif
}
Implementing App42NativePushListener methods in Scripts
Following methods should be implemented in your Script file to use Push plugin
// Register for Push Notification when you get regsitartion Id
	public void onDeviceToken(String deviceToken){
	Debug.Log ("Device token from native: "+deviceToken);
	String deviceType = App42Push.getDeviceType ();
		if(deviceType!=null&&deviceToken!=null&& deviceToken.Length!=0)
			App42API.BuildPushNotificationService().StoreDeviceToken(App42API.GetLoggedInUser(),deviceToken, deviceType,new Callback());
	}
//Push message from native
	public void onMessage(String msg){
		Debug.Log ("Message From native: "+msg);
	}
//Error message from native
	public void onError(String error){
		Debug.Log ("Error From native: "+error);
	}
Register with App42
Once you get registration Id from native you have to register it on App42 for Push Notification.
	public void onDeviceToken(String deviceToken){
		message="Device token from native: "+deviceToken;
		String deviceType = App42Push.getDeviceType ();
		if(deviceType!=null&&deviceToken!=null&& deviceToken.Length!=0)
			App42API.BuildPushNotificationService().StoreDeviceToken(App42API.GetLoggedInUser(),deviceToken, deviceType,new Callback());
   }
Get Last Push Notification Message
You can also get last Push Notification Message using below method written in App42Push.cs file of Assets folder of sample project.
App42Push.getLastPushMessage();
AndroidManifest.xml Modification
If you are integrating in your existing Unity Android application, put following entry into your AndroidManifest.xml as shown below. You have to replace <YOUR_APPLICATION_PACKAGE_NAME> with the value of your package name. Bundle Identifier* name should be same as <YOUR_APPLICATION_PACKAGE_NAME> defined in AndroidManifest.xml file. In this sample it is being used as “com.test.push”. Also, you have to copy contents available inside Assets/Android/plugin folder of this sample into Assets/Android/plugin folder of your project.
<uses-permission android:name="android.permission.INTERNET" />
<uses-permission android:name="android.permission.VIBRATE" />
<uses-permission android:name="android.permission.WAKE_LOCK" />
<uses-permission android:name="com.google.android.c2dm.permission.RECEIVE" />
<permission
	android:name="<YOUR_APPLICATION_PACKAGE_NAME>.permission.C2D_MESSAGE"
	android:protectionLevel="signature" />
<uses-permission android:name="<YOUR_APPLICATION_PACKAGE_NAME>.permission.C2D_MESSAGE" />
<receiver android:name="com.shephertz.app42.push.plugin.App42GCMReceiver"
            android:permission="com.google.android.c2dm.permission.SEND" >
            <intent-filter>
                <action android:name="com.google.android.c2dm.intent.RECEIVE" />
                <action android:name="com.google.android.c2dm.intent.REGISTRATION" />
                <category android:name="<YOUR_APPLICATION_PACKAGE_NAME>" />
            </intent-filter>
        </receiver>
<service android:name="com.shephertz.app42.push.plugin.App42GCMService" >
        </service>
		  <meta-data android:name="push_title" android:value="App42PushUnity"/>
		   <meta-data
            android:name="com.google.android.gms.version"
            android:value="6587000" />
			<meta-data
            android:name="onMessageOpen"
            android:value="com.unity3d.player.UnityPlayerActivity" />
Integration in your Existing project If you want to integrate it in your existing unity project import App42UnityPushPlugin package as a custom asset in your project and follow all necessary steps mentioned above.
Configuring Notification UI
If you want to customize Notification UI,you can modify import plugin source in your Eclipse IDE Push notification received on user device can be configured and can be controlled from the code written in sendNotification method in App42GCMService.java file in library project as shown below
Notification notification = new NotificationCompat.Builder(this)
.setContentTitle(getTitle()).setContentText(message)
.setContentIntent(intent)
.setSmallIcon(android.R.drawable.ic_dialog_info).setWhen(when)
.setNumber(++msgCount)
//.setLargeIcon(getBitmapFromAssets())
.setLights(Color.YELLOW, 1, 2).setAutoCancel(true).build();
notification.defaults |= Notification.DEFAULT_SOUND;
notification.defaults |= Notification.DEFAULT_VIBRATE;
notificationManager.notify(0, notification);
Using API
Once your app is registered you are ready to send message to your app user using following code snippet from any App42 Unity SDK.
App42API.BuildPushNotificationService().SendPushMessageToUser(userName,message,new Callback());
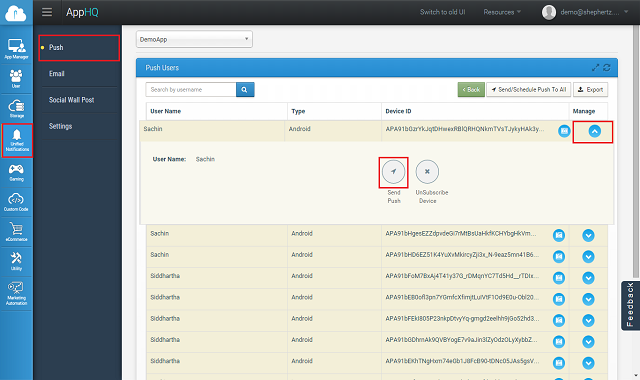
Using AppHQ Console
You can also send push messages to your registered app user directly from AppHQ console. To do this follow the simple steps:
If you want to send push message with sound and badge effect on iOS device, you have to pass JSON string in below format.
string userName = "Nick";
string message = "{'alert':'Hi There...','badge':1,'sound':'default'}";
App42API.BuildPushNotificationService().SendPushMessageToUser(userName ,message ,new Callback());
You can also do it from AppHQ by putting this JSON format in message text area for sending message to iOS device with sound and badge effect.
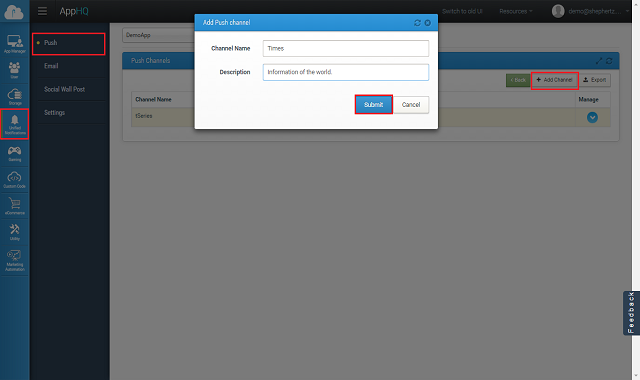
App42 Push notification also supports channel subscription model where user can subscribe on channel of his interest to receive the notification. You can send message to channel which will deliver message to all users who are subscribed to that channel. A channel can be created from AppHQ console. To do this follow the simple steps:
Unity Method :
Here is Unity Code to send Push Notification to Channel.
string channelName = "cricket channel";
string description= "channel description";
//User must be registered with App42 for Push Notification
string userName = "Nick";
//Create Channel
PushNotificationService pushNotificationService =App42API.BuildPushNotificationService();
pushNotificationService.CreateChannelForApp (channelName , description,new Callback());
//Subscribe user to that channel
pushNotificationService.SubscribeToChannel (channelName ,userName,new Callback());
// Now send message on the Channel
string message = "Mumbai Indians won IPL 6";
PushNotification pushNotification = pushNotificationService.SendPushMessageToChannel(channelName ,message,new Callback());
App42 Push Notification Service has introduced API to target users who have specific profile/preference. This API requires user preference or profile persistence in Storage Service as a prerequisite. To identify a specific user segmentation, your app user profile or preference information should be saved on App42 cloud e.g. if you are building a music streaming app and you want to send push notifications to all those users who like Rock music, you should have preference of user stored in App42 cloud already and it can be done using Storage Service as shown below.
Saving User Preference
//Set Logged in User Name
App42API.SetLoggedInUser("USER_NAME");
String profileJSON = "{\"preference\":\"Rock\",\"age\":30,\"company\":\"ShepHertz\"}";
StorageService storageService = App42API.BuildStorageService();
storageService.InsertJSONDocument("DB_NAME", "COLLECTION_NAME", profileJSON, new Callback() );
Sending Push to Segmented User
Once your app user’s profile/preference information is saved, you can send Push Notification to the segmented user who meets specific criteria (Assuming your app user is already subscribed for push notification. For example, here you can send Push Notification to segmented users who likes Rock music as explained below.
Query targetQuery = QueryBuilder.Build("preference","Rock", Operator.EQUALS);
String message = "New Album of Rock Music has just Arrived. Please check it out here!!";
PushNotificationService pushNotificationService = App42API.BuildPushNotificationService();
pushNotificationService.SendPushToTargetUsers(message, "DB_NAME", "COLLECTION_NAME", targetQuery);
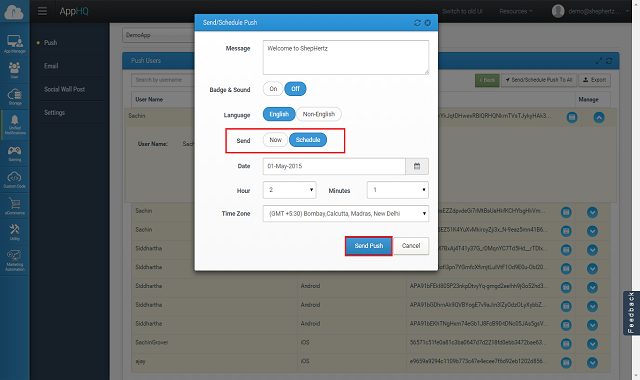
You can also schedule message to your app user on specified time from AppHQ console. To do this follow the simple steps:
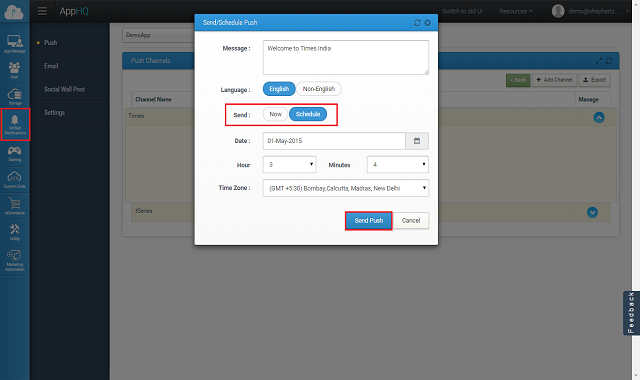
Message scheduling on channel can be done in similar way. To do this follow the simple steps:
Push notification goes from App42 server to GCM server and then device. Delivery of Push notification is not guaranteed from GCM to device and it is stated as best effort. Once it is delivered on user device, there might be a chance that user clears it without actually Opening the message.
Using App42 Push Analytics, you can track how many push notification was sent from your side, how many were delivered and how many were opened by the user. You can see these analytics from AppHQ console which will give a better insight of push notification campaign.
If you want to track push message read/opened event you have to simply put following snippet after Message is clicked and lands to your game/app. This will enable tracking of push message and analytics can be seen from AppHQ console.
App42API.BuildLogService().SetEvent("Message", "Opened", new Callback());
Once your device is registered for Push Notification you are ready to send multilingual(UTF-8) push message to your app user using following code snippet from any App42 SDK (Android/Java/WP etc)
String userName = "Nick";
String message = "Message which you have to send";
App42Log.SetDebug(true);		//Print output in your editor console
Dictionary<String, String> otherMetaHeaders = new Dictionary<String, String>();
otherMetaHeaders.Add("dataEncoding", "true");
pushNotificationService.SetOtherMetaHeaders(otherMetaHeaders);
pushNotificationService.SendPushMessageToUser(userName,message, new UnityCallBack());
public class UnityCallBack : App42CallBack
{
	public void OnSuccess(object response)
	{
		PushNotification pushNotification = (PushNotification) response;
		App42Log.Console("Message is " + pushNotification.GetMessage());
		App42Log.Console("userName is : " + pushNotification.GetMessage());
	}

	public void OnException(Exception e)
	{
		App42Log.Console("Exception : " + e);
	}
}
//Old One remove it
void Start (){
	DontDestroyOnLoad(transform.gameObject);
	App42API.Initialize(Constants.ApiKey,Constants.SecretKey);
	App42API.SetLoggedInUser(Constants.UserId);
	//If your App is ACL App, uncomment and pass session id of logged in user in below line
	//App42API.SetUserSessionId("<Logged_In_User_Session_Id>");
	RegisterForPush();
	getLastMessage();
}

public void RegisterForPush(){
object[] googleProjectNo = new object[]{Constants.GoogleProjectNo};
object[] unityParam = new object[]{Constants.CallBackMethod,this.gameObject.name ,UnityRegistrationMethod};
	using (var actClass = new AndroidJavaClass("com.unity3d.player.UnityPlayer")) {
	playerActivityContext = actClass.GetStatic<AndroidJavaObject>("currentActivity");
		using (var pluginClass = new AndroidJavaClass("com.shephertz.app42.android.pushservice.App42PushService")) {
			if (pluginClass != null) {
				testobj = pluginClass.CallStatic<AndroidJavaObject>("instance",playerActivityContext);
				testobj.Call("setProjectNo",googleProjectNo);
				testobj.Call("registerForNotification",unityParam);
			}
		}
	}
}

public void getLastMessage(){
object[] googleProjectNo = new object[]{Constants.GoogleProjectNo};
object[] unityParam = new object[]{Constants.CallBackMethod,this.gameObject.name,UnityRegistrationMethod};
using (var actClass = new AndroidJavaClass("com.unity3d.player.UnityPlayer")) {
	playerActivityContext = actClass.GetStatic<AndroidJavaObject>("currentActivity");
	using (var pluginClass = new AndroidJavaClass("com.shephertz.app42.android.pushservice.App42PushService")) {
		if (pluginClass != null) {
			testobj = pluginClass.CallStatic<AndroidJavaObject>("instance",playerActivityContext);
			testobj.Call("getLastMessage");
			}
		}
	}
}
public void Start (){
DontDestroyOnLoad (transform.gameObject);
App42API.Initialize(ApiKey,SecretKey);
App42API.SetLoggedInUser(UserId);
//Put Your Game Object Here
App42Push.setApp42PushListener (this);
#if UNITY_ANDROID
	App42Push.registerForPush (GoogleProjectNo);
	message=App42Push.getLastPushMessage();
#endif
}
public void StoreDeviceId(string deviceId) {
	App42API.BuildPushNotificationService().StoreDeviceToken(App42API.GetLoggedInUser(),deviceId,
	Constants.DeviceType,new Callback());
}
public void Success(string msg) {
Debug.Log("Push Message is Here: " + msg);
	if(msg != null) {
		Debug.Log("Push Message is Here: " + msg);
		message=msg;
		app42Response="";
	}
}
public void onDeviceToken(String deviceToken){
string message="Device token from native: "+deviceToken;
String deviceType = App42Push.getDeviceType ();
if(deviceType!=null&&deviceToken!=null&& deviceToken.Length!=0)
	App42API.BuildPushNotificationService().StoreDeviceToken(App42API.GetLoggedInUser(),deviceToken,deviceType,new Callback());
}
public void onMessage(String msg){
	string message="Message From native: "+msg;
}
public void onError(String error){
	string errorMsg="Error From native: "+error;
}
For more details of Push Notification Documentation


