
This tutorial will help you configure your Android app to send and receive push notifications. App42 Cloud API provides push notifications using FCM (Firebase Cloud Messaging). You may then send push notifications from AppHQ console as well as shoot notifications by simply using APIs to your app users. The beauty of App42 Push is that you can schedule notifications and even send location based messages as well. Along with sending push notifications, you can also capture detailed insights of the response your push messages with the analytics. Please follow these easy steps to get started with the App42 platform and start sending push messages within minutes.
  @Override
  public void onCreate(Bundle savedInstanceState)
  {
      super.onCreate(savedInstanceState);
      setContentView(R.layout.activity_main);
      App42API.initialize(this,"","");
      App42API.setLoggedInUser("") ;
  }

 public void onStart() {
    super.onStart();
    if (App42FCMController.isPlayServiceAvailable(this)) {
        App42FCMController.getFCMToken(MainActivity.this, this);
    } else {
        Log.i("App42PushNotification",
                "No valid Google Play Services APK found.");
    }
}
The code snippet provided will carry out most of the important work for you conveniently. Once your app gets started, it will register your application with App42 platform in order to send push notifications. Just to let you know, it uses storeDeviceToken method to register your application with the App42 server. This is just a onetime activity and will be done automatically whenever the app is opened.
If you want to know the details about the sample code, please go through App42FCMController.java which basically takes care of all the FCM related tasks. Once your application gets registered with FCM, you will get token, which you will have to register using registerWithApp42 method defined in the class as shown below
  public static void getFCMToken(Context context, App42GCMListener callBack) {

    String fcmToken = App42FCMController.getFCMToken(context);
    if (fcmToken.isEmpty()) {
        registerOnFCM(context, callBack);
    } else {
        callBack.onFCMTokenFetch(fcmToken);
    }
}

     //Method to get registered with App42 Platform
      public static void registerOnApp42(String userName,String deviceToekn,final App42GCMListener callBack){
          App42API.buildPushNotificationService().storeDeviceToken(userName, deviceToekn, new App42CallBack() {
              @Override
              public void onSuccess(Object arg0) {
                  App42Response response=(App42Response) arg0;
                  callBack.onRegisterApp42(response.getStrResponse());
             }

             @Override
             public void onException(Exception arg0) {
                 // TODO Auto-generated method stub
                 callBack.onApp42Response(arg0.getMessage());
             }
         });
     }
The next step is to include the following permissions and entries that are necessary to complete the integration process of Push Notifications in your project. Sample Android Manifest contains these entries already; however, if you are integrating in your existing project then you would have to put the following code in your Manifest too:
<uses-permission android:name="android.permission.ACCESS_FINE_LOCATION" />
<uses-permission android:name="android.permission.INTERNET" />
<uses-permission android:name="android.permission.ACCESS_COARSE_LOCATION" />
<uses-permission android:name="android.permission.VIBRATE" />

<uses-library
    android:name="org.apache.http.legacy"
    android:required="false"/>

 <service
    android:name="com.shephertz.app42.push.plugin.App42FCMService"
    android:exported="false">
    <intent-filter>
        <action android:name="com.google.firebase.MESSAGING_EVENT" />
    <intent-filter>
<service>
          <meta-data
             android:name="onMessageOpen"
             android:value="com.example.app42Sample.MainActivity" />
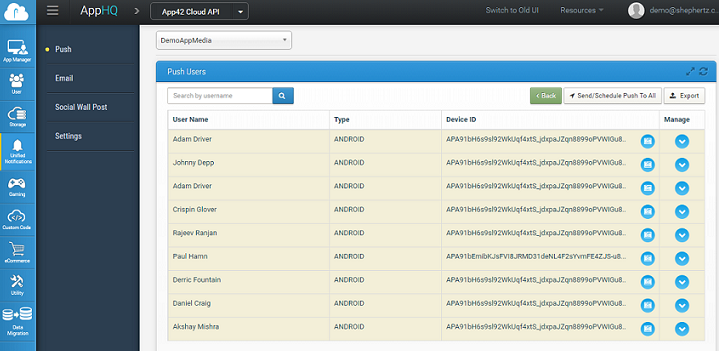
After the successful run of your app, you can verify your registered users under Unified Notifications -> Push -> Users section as shown below.
Once your application is successfully registered, you may start sending push to your users using the following code snippet from any of the App42 SDKs
From API
PushnotificationService pushnotificationService = App42API.buildPushnotificationService();
PushNotification pushNotification = pushNotificationService.sendPushMessageToUser(userName,message);
From AppHQ Console
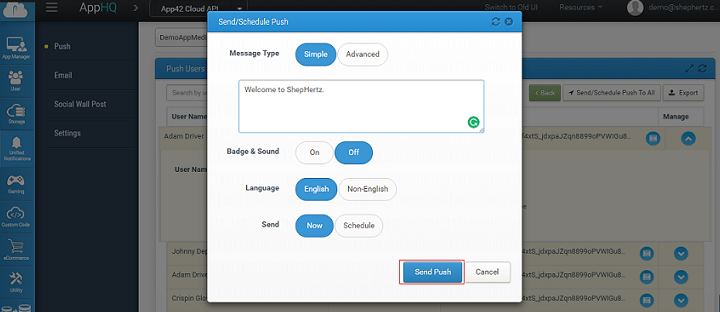
You may even send push notifications to your registered app users directly through AppHQ console. Follow these simple steps to send your first push:
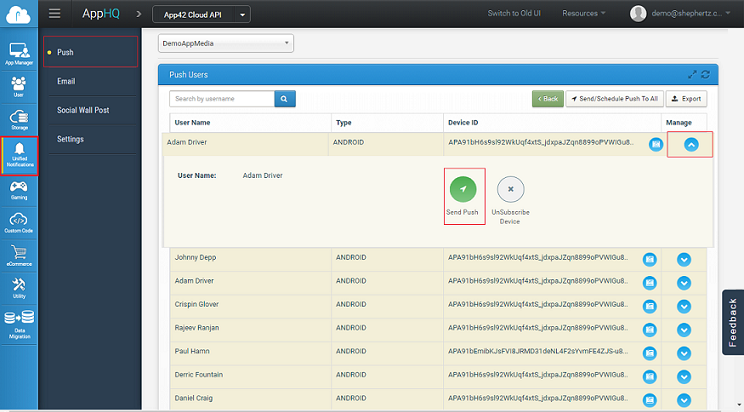
Enter your push notification copy and click on send button as shown below. This will trigger the push notification to your app users
Doesn’t matter if you have registered your application for Android Push Notifications, you may send push with sound and badges to iOS devices as well. Just pass the following JSON string in the following format:
PushnotificationService pushnotificationService = App42API.buildPushnotificationService();
String userName = "Nick";
//Message format for iOS device with sound and badge
String message = "{'alert':'Hi There...','badge':1,'sound':'default'}";
PushNotification pushNotification = pushNotificationService.sendPushMessageToUser(userName,message);
You may also do it through AppHQ console by putting this JSON format in message text area for sending message to an iOS device with sound and badge effects
App42 Push also supports subscription based model where users can subscribe to a channel of their interest to receive notifications related only to that channel. You can send message to a channel which will deliver your message to all the users who have subscribed to that particular channel.
//
// First Subscribe User to Channel
//
String channelName = "cricket channel";
String userName = "Nick";
PushNotification pushNotification = pushNotificationService.subscribeToChannel(channelName,userName);
//
// Now send message on the Channel
//
String channelName = "cricket channel";
String message = "Mumbai Indians won IPL 6";
PushNotification pushNotification = pushNotificationService.sendPushMessageToChannel(channelName,message);
App42 Push enables you to target users based on their specific profile or preference. This feature requires user preference or profile persistence in Storage Service as a prerequisite. To identify a specific user segmentation, the user profiles or preference information should be saved on App42 cloud. For example, if you are building a media app and would like to send push notifications to all the users who like sports news, you should have the preference of those users stored in App42 cloud already. This can be achieved using Storage Service as shown below:
Saving User Preference
  //Set Logged in User Name
  App42API.setLoggedInUser("USER_NAME");
  String profileJSON = "{\"preference\":\"Rock\",\"age\":30,\"company\":\"ShepHertz\"}";
  StorageService storageService = App42API.buildStorageService();
  storageService.insertJSONDocument("DB_NAME", "COLLECTION_NAME", profileJSON );
Sending Push to Segmented Users
Once your app user’s profile/preference information is saved, you can send Push Notification to the segmented user who meets specific criteria (Assuming your app user is already subscribed for push notification. For example, here you can send Push Notification to segmented users who likes Rock music as explained below.
Query targetQuery = QueryBuilder.build("preference","Rock", Operator.EQUALS);
String message = "Did you watch the last night's match? We are excited to share the analysis!";
PushNotificationService pushNotificationService = App42API.buildPushNotificationService();
pushNotificationService.sendPushToTargetUsers(message, "DB_NAME", "COLLECTION_NAME", targetQuery);
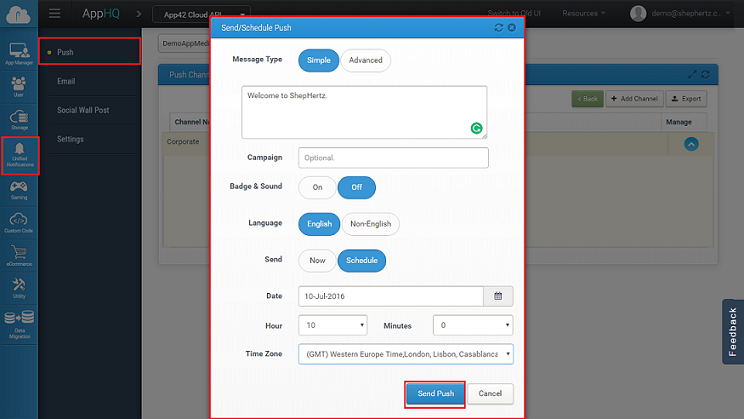
You may even schedule message to your app users on a particular time through AppHQ console. Simply follow these easy steps:
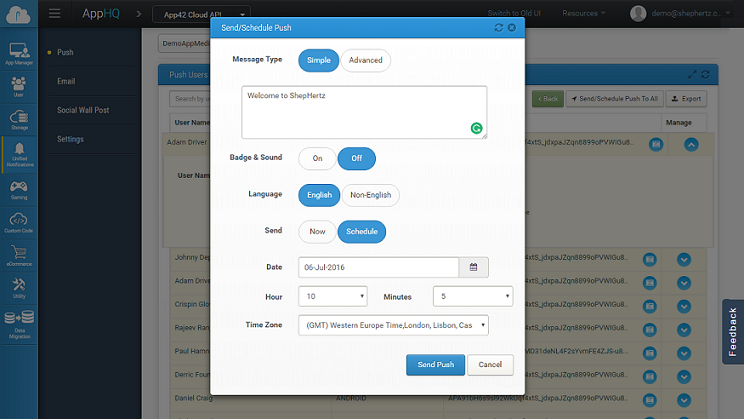
Scheduling future push notifications on channels can also be done in the similar way. To do this follow the simple steps:
Push notification received on user device can be configured and can be controlled from the code written in generateNotification method as shown below
 NotificationCompat.Builder notificationBuilder = new NotificationCompat.Builder(this, getResources().getString(R.string.default_notification_channel_id))
        .setSmallIcon(R.mipmap.ic_launcher)
        .setContentTitle(title)
        .setStyle(new NotificationCompat.BigTextStyle().bigText(msg))
        .setContentText(msg).setWhen(when).setNumber(++msgCount)
        .setLights(Color.YELLOW, 1, 2).setAutoCancel(true)
        .setDefaults(Notification.DEFAULT_SOUND)
        .setDefaults(Notification.DEFAULT_VIBRATE);
You can specify which Activity should be opened once user clicks on message. Its configured inside AndroidManifest.xml as shown below
    <meta-data
            android:name="onMessageOpen"
            android:value="com.example.app42Sample.MainActivity" />
Push notification is shot from the App42 server to FCM server and then to the devices. The delivery of the push is not guaranteed by FCM to the devices and it is stated as a best effort. Once it is delivered on the users’ devices, there are chances that a user clears it without actually reading the message
Using App42 Push Analytics, you can keep a track of how many push notifications were sent by you and out of them how many were delivered and subsequently opened by the users. You can monitor all this from the AppHQ console which will give you a better and detailed insight of the sent push notifications.
If you would like to track how many push messages were read/opened, you would have to put the following snippet after the message is clicked and lands to your activity. This will enable the tracking of push notifications and analytics can be checked from AppHQ console.
App42API.buildLogService().setEvent("Message", "Opened", new App42CallBack() {
	public void onSuccess(Object arg0) {
		// TODO Auto-generated method stub
	}
	public void onException(Exception arg0) {
		// TODO Auto-generated method stub
	}
});
By registering your application with App42 you are automatically empowered to send multilingual(UTF-8) push messages to your app user using the following code snippet from any of the App42 SDKs
 String userName = "Nick";
  String message = "Message which you have to send";
  HashMap<String, String> otherMetaHeaders = new HashMap<String, String>();
  otherMetaHeaders.put("dataEncoding", "true");
  pushNotificationService.setOtherMetaHeaders(otherMetaHeaders)
  pushNotificationService.sendPushMessageToUser(userName, message, new App42CallBack() {
      public void onSuccess(Object response)
      {
          PushNotification pushNotification  = (PushNotification)response;
         System.out.println("userName is " + pushNotification.getUserName());
         System.out.println("Message is " + pushNotification.getMessage());
         System.out.println("Expiry is"+pushNotification.getExpiry());
     }
     public void onException(Exception ex)
     {
         System.out.println("Exception Message"+ex.getMessage());
     }
 });
For more details and advanced features, please check out the Push Notification Documentation.


