Push Notification helps you in sending event or alert to your app users even when they are not logged into app. App42 uses GCM (Google Cloud Messaging) to send Push Notification on Android devices. You can send push notification from UI console as well as can use APIs to send and schedule Push notification to your app users. App42 also gives you interesting insight about analytics of push messages too. Here are the few easy steps to get started with an App42 Android Push Notification using a sample project in a few minutes.
 Register with App42 platform
Create an app once you are on Quick-start page after registration.
If you are already registered, login to AppHQ console and create an app from App Manager -> App Create link.
Create a project and get your GCM Project Id from google developer console. It would be available in Overview section of your created project.
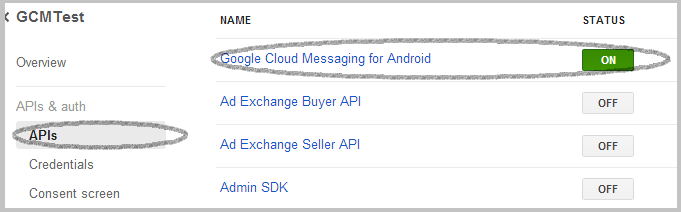
Select your created project and click on APIs option in Google developer console and enable Google Cloud Messaging for Android service.
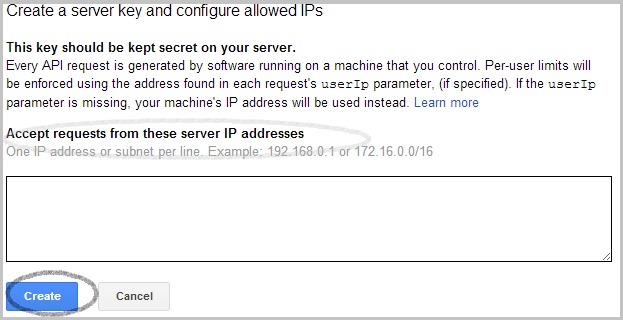
Click on Credentials from left menu -> Create New Key -> Server Key.

Keep Accept requests from these server IP addresses as blank and click on Create button
From AppHQ console click on Push Notification and select Android Settings in Settings option.
Select your app ,Select the GCM under Provider section and copy server key under push key section which is generated in Google developer console in above step and submit it.

In the Object Inspector, set the following properties of the App42Provider:
Expand the Android Push node and copy to GCMAppID the Project Number from above step.
Set UserName for the user
On the form, select PushEvent1 and go to the Object Inspector.
Check whether the Provider property is set to App42Provider1
Switch to Code tab by pressing F12.
Define the event handlers as follows:
implementation
procedure TForm1.PushEvents1DeviceRegistered(Sender: TObject);
begin
  Memo1.Lines.Add('Device Registered');
  Memo1.Lines.Add('');
end;
procedure TForm1.PushEvents1DeviceTokenReceived(Sender: TObject);
begin
  Memo1.Lines.Add('Device Token Received');
  Memo1.Lines.Add('');
end;
procedure TForm1.PushEvents1DeviceTokenRequestFailed(Sender: TObject;
  const AErrorMessage: string);
begin
  Memo1.Lines.Add('Device Token Request Failed');
  Memo1.Lines.Add(AErrorMessage);
  Memo1.Lines.Add('');
end;
procedure TForm1.PushEvents1PushReceived(Sender: TObject;
  const AData: TPushData);
begin
  Memo1.Lines.Add('Device push received');
  Memo1.Lines.Add(AData.Message);
  Memo1.Lines.Add('');
end;
end.
To enable GCM support in an Android application you will need to include some additional entries in the AndroidManifest.xml for the project. When you build your project, RAD Studio uses AndroidManifest.template.xml as a template to generate AndroidManifest.xml in the output directory.
Adding the Permissions
Some of the necessary permissions can be enabled in the project options, but it is easier just to copy and insert the whole block including all permissions needed for GCM. In the AndroidManifest.template.xml file search for a template variable:
    <uses-permission android:name="android.permission.INTERNET" />
    <uses-permission android:name="android.permission.GET_ACCOUNTS" />
    <uses-permission android:name="android.permission.WAKE_LOCK" />
    <permission android:name="%package%.permission.C2D_MESSAGE"
    android:protectionLevel="signature" />
    <uses-permission android:name="%package%.permission.C2D_MESSAGE" />
    <uses-permission
    android:name="com.google.android.c2dm.permission.RECEIVE" />
Registering the Receiver Class
Search for this block: </intent-filter> </activity> Add the following
<receiver
      android:name="com.embarcadero.gcm.notifications.GCMNotification" android:exported="true"
      android:permission="com.google.android.c2dm.permission.SEND" >
        <intent-filter>
          <action android:name="com.google.android.c2dm.intent.RECEIVE" />
          <category android:name="%package%" />
        </intent-filter>
</receiver>
Registering the Service Class
This is a Java class that will create an entry in the Notification Center of the Android Device - even if the application itself is not running while the remote notification comes in. If you don’t need or want items in the Notification Center, you can skip this step. Add the following code below the previous block from Registering the Receiver Class:
<service android:name="com.embarcadero.gcm.notifications.GCMIntentService" />
Now your application is ready to run on either a simulator or your connected mobile device. To run your application
In Project Manager, select your target platform.
Choose either of the following commands: Run > Run /(OR) Run > Run Without Debugging
Click the Active checkbox.
Once your app is registered you are ready to send message to your app user using following code snippet from any App42 SDK (Android/Java/WP etc)
From API
PushnotificationService pushnotificationService = App42API.buildPushnotificationService();
PushNotification pushNotification = pushNotificationService.sendPushMessageToUser(userName,message);
From AppHQ Console
You can also send push messages to your registered app user directly from AppHQ console. To do this, go to AppHQ console and click on Push Notification -> Click on Users -> Select your App -> select your user from table and click on send push button. This will open a pop up to type your message, once you are done click on send button. This will trigger a push notification message to your app user.
